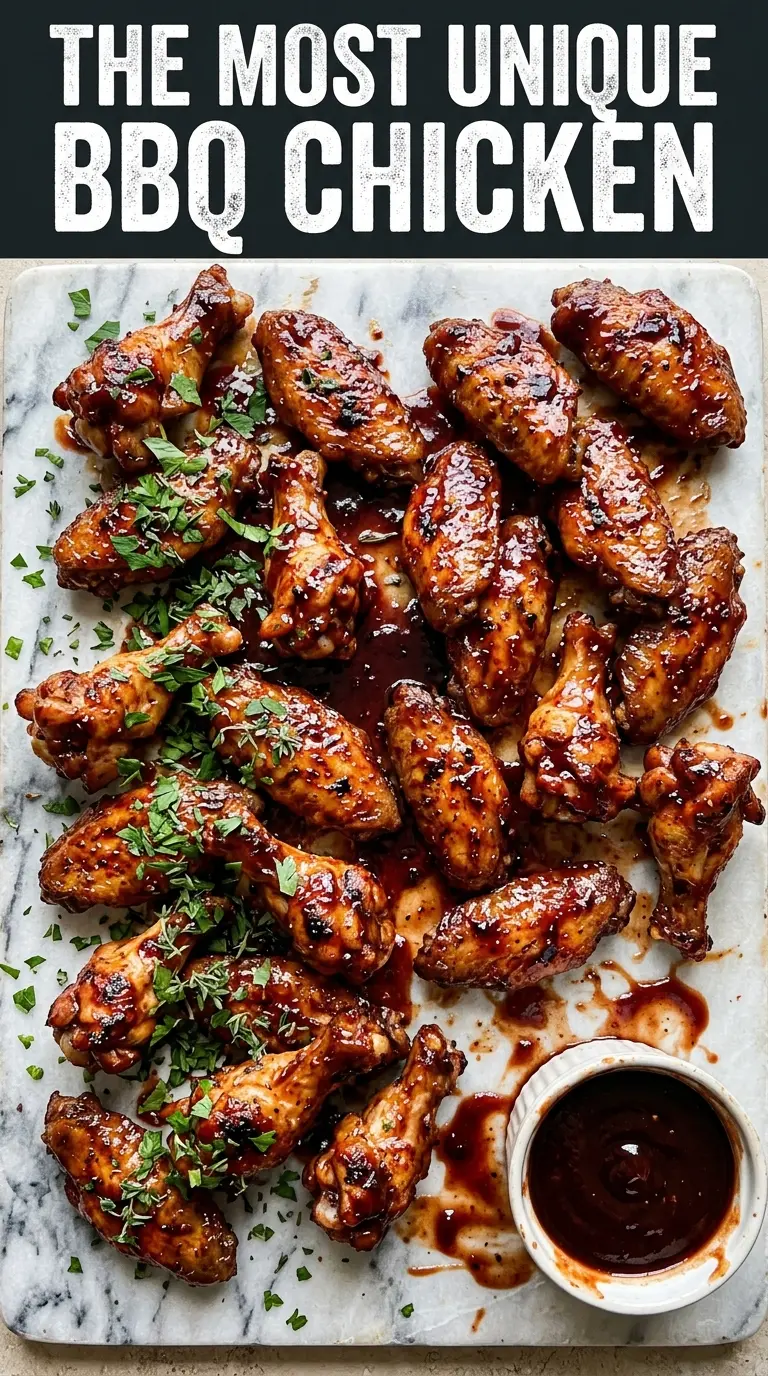
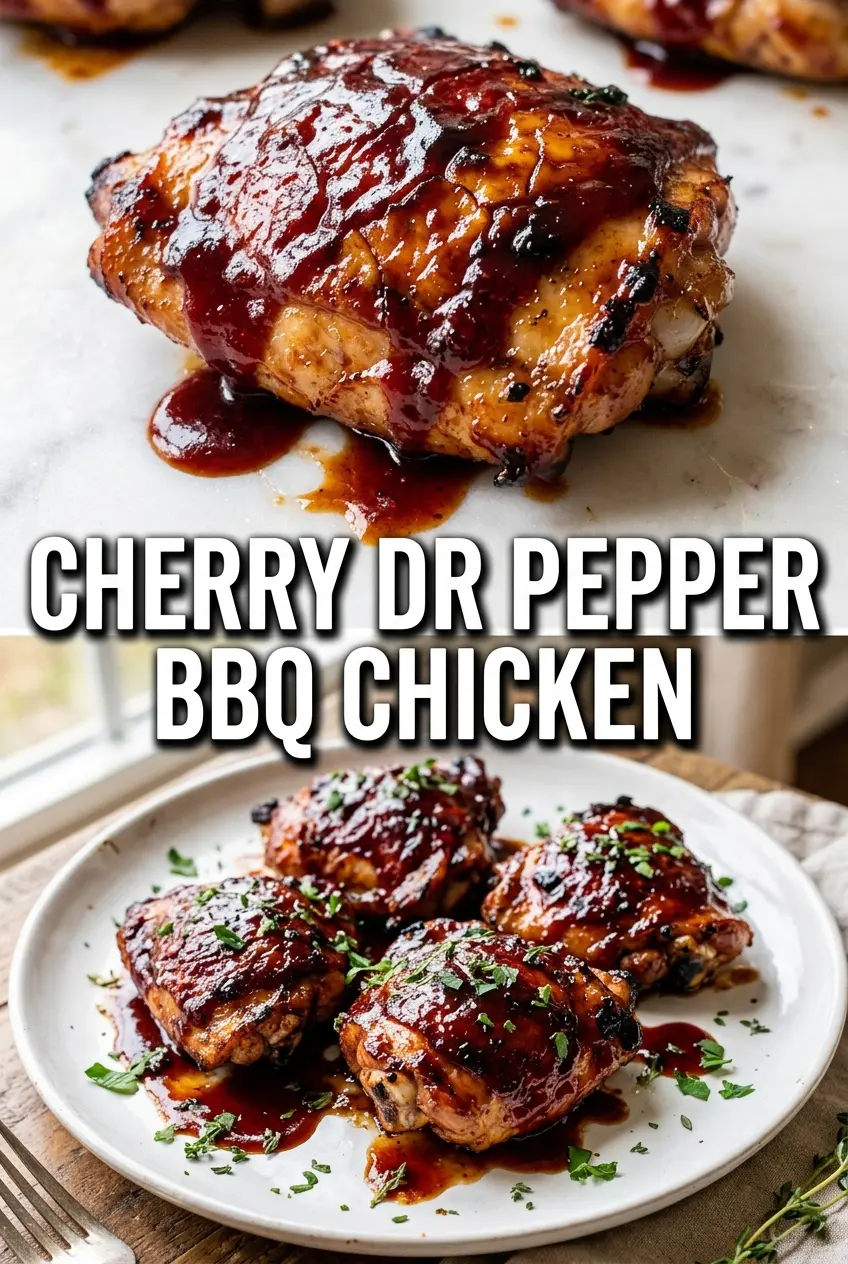
Sticky, glossy Cherry Dr Pepper BBQ Chicken has the kind of sweet-smoky glaze that clings to every bite and turns a simple pan of chicken into the first thing people reach for at the table. The sauce cooks down into a deep mahogany coating with just enough cherry brightness to keep it from tasting heavy, and the final result is equal parts barbecue comfort and a little something unexpected.
What makes this version work is the balance. Dr Pepper brings caramel notes and a gentle spice, cherry preserves add body and fruit flavor, and the vinegar keeps the sauce from turning flat or sticky-sweet. I like to simmer half the sauce before it ever touches the chicken so it can thicken a bit and build real flavor; then the reserved batch stays glossy for serving. That split is what gives you layers instead of a one-note glaze.
Below, I’ll walk through the small decisions that matter most: how to simmer the sauce so it coats instead of runs, when to start basting, and how to keep the chicken from drying out while the glaze turns sticky and dark.
The sauce thickened up into this perfect sticky glaze, and the cherry flavor came through without tasting candy-sweet. I basted it near the end like you said, and the chicken stayed juicy with those dark caramelized edges.
Save this Cherry Dr Pepper BBQ Chicken for the nights when you want sticky cherry glaze and smoky barbecue flavor in one pan.
The Sauce Needs Time Before It Touches the Chicken
If the glaze goes onto the chicken while it’s still thin and sharp-tasting, it won’t cling; it just runs off and leaves you with barbecue-colored skin instead of a real coating. The short simmer is what changes the sauce from a loose mix into something that can lacquer the chicken in those last 10 minutes.
Dr Pepper and cherry preserves both bring sugar, which means the sauce will thicken faster than a plain barbecue sauce once it starts to reduce. That’s why medium heat works best here. High heat can push it from glossy to scorched in a few minutes, especially once you start brushing it onto the chicken.
What Each Ingredient Is Actually Doing in This Glaze
- Dr Pepper — This is more than sweetness. It brings spice, caramel notes, and enough acidity to help the sauce taste layered instead of flat. A cola-style soda can work in a pinch, but you’ll lose some of the cherry-leaning depth that makes this version stand out.
- Cherry preserves — These give the sauce body and visible fruit flavor. Jam works too, but preserves are better because the fruit pieces hold up and show up on the finished chicken. If your preserves are very thick, loosen them with a tablespoon or two of the soda before they go into the pan.
- BBQ sauce — Use one you actually like on its own, because it makes up the base of the glaze. A sweet smoky sauce blends best here. If you start with a thin or overly vinegar-forward barbecue sauce, the finished chicken can taste harsh once the soda reduces.
- Apple cider vinegar — This is the piece that keeps the glaze from tasting like dessert. It sharpens the cherry and cuts through the richness of the BBQ sauce. Don’t skip it unless your barbecue sauce is already very tangy.
- Worcestershire sauce — This adds savory depth and helps the glaze taste cooked, not bottled. There isn’t a perfect substitute, but a splash of soy sauce plus a little extra vinegar will get you close if needed.
Building the Glaze Without Burning the Sugars
Starting the Sauce
Combine everything for the glaze in a saucepan and bring it to a steady simmer over medium heat. You’re looking for small bubbles across the surface, not a hard boil. Stir often enough that the preserves melt evenly and don’t settle on the bottom, where they can scorch before the rest of the sauce has a chance to thicken.
Testing the Coating
After about 10 minutes, lift a spoon through the sauce and watch how it falls. It should coat the spoon lightly and leave a trail for a second or two before filling in. If it still looks watery, give it a few more minutes; if it starts to feel sticky around the edges of the pan, pull it off the heat right away and save it from burning.
Cooking and Basting the Chicken
Season the chicken with salt and pepper, then grill over medium heat until it’s cooked through and picking up a little color. Wait until the last 10 minutes to start brushing on the sauce so the sugars have time to lacquer instead of blacken. Turn the chicken as you baste, building thin layers each time. That’s how you get a sticky finish with caramelized edges instead of a burnt shell.
Finishing at the Right Temperature
Take the chicken off when the thickest part reaches 165°F. Letting it go past that point dries out the dark meat faster than you’d expect, especially once the glaze is on. Spoon the reserved sauce over the top and add fresh cherries right before serving so the whole platter looks glossy and fresh.
How to Adapt the Glaze When You Need a Different Route
Make It Gluten-Free
Use a certified gluten-free barbecue sauce and check the Worcestershire sauce label, since some brands include malt vinegar or other gluten ingredients. The rest of the recipe stays the same, and the glaze will still reduce into that sticky finish.
Swap in Boneless Chicken Thighs
Boneless thighs cook faster and are easier to glaze evenly, but they won’t give you the same platter-worthy presentation as thighs and drumsticks. Start checking them early so they don’t dry out, and keep the sauce layers thin since the exposed surface caramelizes faster.
Turn It Into Oven-Baked Chicken
Bake the seasoned chicken at 400°F on a lined sheet pan until nearly cooked through, then brush on the glaze for the final stretch. The oven version won’t give you grill marks, but it still develops a dark, sticky coating if you let the sauce set in layers instead of dumping it on all at once.
Use a Different Cherry Format
If you only have frozen cherries, thaw and chop them before adding them to the sauce so they blend in and don’t cool the pan too much. Fresh cherries are best for garnish, but frozen ones work fine inside the glaze where texture matters less.
Storage and Reheating
- Refrigerator: Store leftovers in an airtight container for up to 4 days. The glaze will thicken as it chills, and the chicken will hold onto the flavor well.
- Freezer: This freezes better than most glazed chicken recipes, though the sauce may lose a little shine. Freeze in portions for up to 2 months and thaw overnight in the refrigerator.
- Reheating: Reheat covered in a 325°F oven with a spoonful of reserved sauce or a splash of water to keep the glaze from tightening up. The biggest mistake is blasting it in the microwave until the sugars turn sticky in all the wrong places and the chicken dries out.
Questions I Get Asked About This Recipe
Cherry Dr Pepper BBQ Chicken
Ingredients
Equipment
Method
- Combine BBQ sauce, Dr Pepper, cherry preserves, apple cider vinegar, Worcestershire sauce, and garlic powder in a saucepan and stir to combine. Simmer over medium heat for 10 minutes until slightly thickened, then reserve half for serving.
- Season chicken pieces with salt and pepper to taste. Grill over medium heat for 20-25 minutes, turning occasionally, until browned and nearly cooked through.
- Brush chicken generously with the sauce in the last 10 minutes, building up layers of glaze. Continue grilling until the glaze looks deep mahogany and glossy.
- Check doneness by taking an internal temperature reading; remove when it reaches 165°F. Serve with the reserved sauce and fresh cherries for garnish.