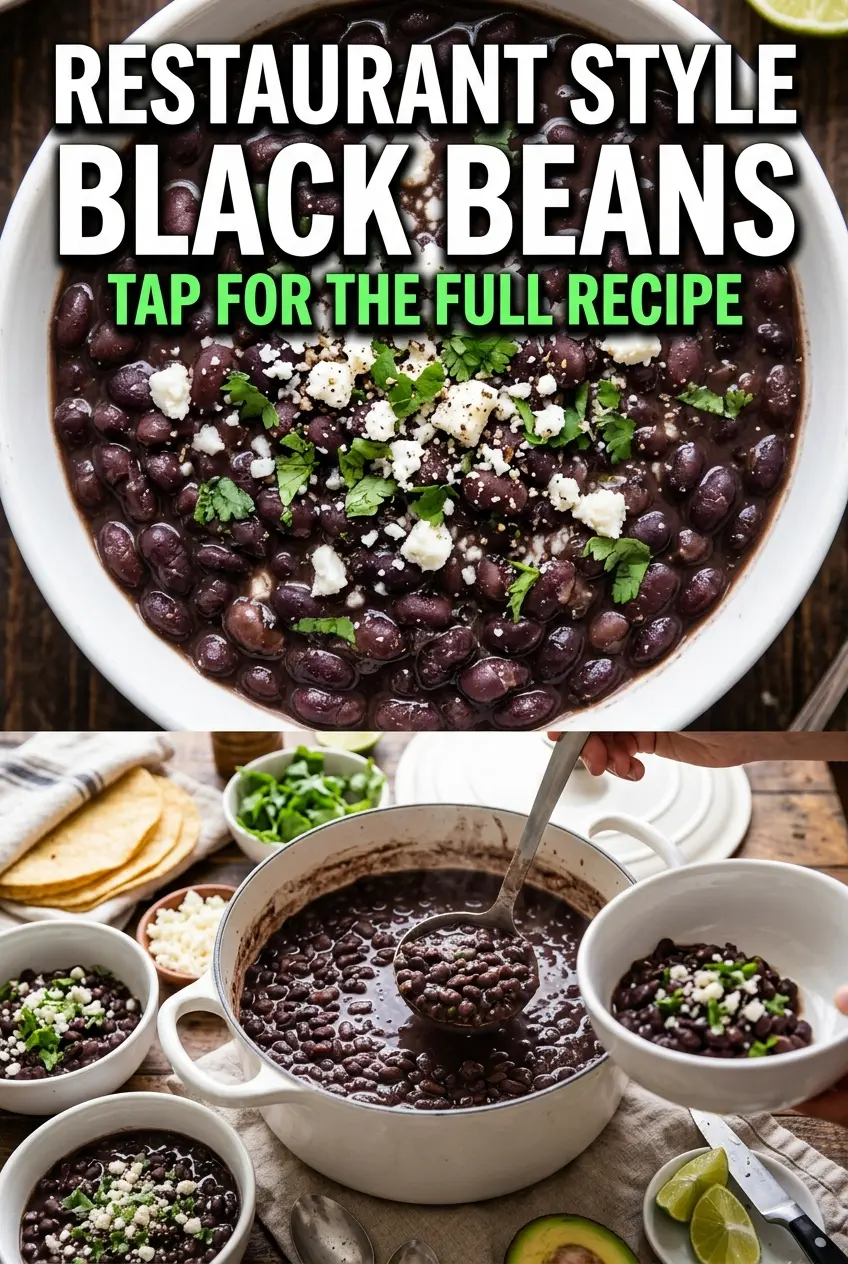
Restaurant-style black beans earn their spot on the table because they don’t sit there like a plain side dish. They turn glossy, creamy, and deeply seasoned, with whole beans still holding their shape and just enough broth left to cling to rice, tacos, or a spoon. The difference is in the way they’re built: onion and garlic first, beans simmered with broth and bay leaves, then a partial mash at the end to give the pot body without turning it into purée.
That last step matters more than people think. If you mash too early, the beans can go past creamy into muddy. If you skip the simmer, they taste like beans from a can that were warmed up and salted. A little lime at the end wakes everything up, and cilantro gives the whole pot a fresh finish that keeps the beans from feeling heavy.
Below, I’m walking through the exact point where the texture changes, the ingredient that makes these taste like they came from a good Mexican restaurant, and the small adjustment that helps if you want them thicker, looser, or dairy-free.
The beans turned out creamy without getting mushy, and the lime at the end made the whole pot taste bright instead of flat. I served them with tacos and my husband kept going back for another spoonful.
Want creamy restaurant-style black beans with a bright finish? Save this recipe for taco nights, burrito bowls, and easy weeknight sides.
The Part Most Bean Recipes Skip: Letting the Pot Reduce Before You Mash
Black beans need more than heat. They need time for the broth, garlic, cumin, and onion to pull into the liquid so the pot tastes seasoned all the way through, not just on the surface. That’s why the beans simmer uncovered here. If you cover the pot, the liquid stays thin and the beans taste washed out. If you rush the simmer, the mash at the end won’t have enough concentrated liquid to turn silky.
The other mistake is mashing too much too early. You want just enough broken beans to thicken the broth and create that restaurant-style gloss, while leaving plenty of whole beans for texture. A wooden spoon or potato masher works best because you’re controlling the amount of pressure. A blender turns this into something closer to purée, which is a different dish entirely.
What Each Ingredient Is Actually Doing in the Pot
- Black beans — Canned beans are the shortcut that makes this weeknight-fast, but draining and rinsing them matters. It removes the tinny liquid and lets the simmered broth season the beans directly. If you use cooked-from-dry beans, use about 4 1/2 to 5 cups cooked beans and keep the same method.
- White onion — Quartering the onion instead of dicing it gives the pot a gentler onion flavor that melts into the broth without disappearing completely. You’re building background sweetness here, not a chunky salsa base.
- Garlic — Minced garlic bloomed briefly in oil tastes rounder and deeper than adding it straight to the liquid. Don’t let it brown; once garlic turns dark, it gets bitter fast and the whole pot follows it.
- Bay leaves and cumin — Bay leaves add a slow, savory note that makes the beans taste simmered instead of merely mixed. Cumin brings the familiar restaurant-style warmth. Fresh spices help, but this recipe still works with pantry cumin as long as it hasn’t gone dusty and flavorless.
- Broth — Vegetable broth keeps the beans fully vegetarian, while chicken broth adds a little extra richness. Water will work in a pinch, but it won’t give you the same depth, so the beans may need a stronger finish of salt and lime.
- Cilantro and lime — These go in at the end because heat dulls both of them. The cilantro adds freshness, and the lime snaps the savory flavors into focus so the beans taste finished instead of flat.
How to Build Creamy Beans Without Turning Them Into Mash
Softening the Onion and Garlic
Start the onion in olive oil and let it cook just until it turns translucent at the edges and loses its raw bite. You’re not chasing color here. The garlic goes in after that for only a minute, long enough to smell fragrant and a little nutty. If the garlic starts to brown before the beans go in, lower the heat immediately; browned garlic can make the entire pot taste harsh.
Simmering the Beans Until the Broth Thickens
Add the beans, bay leaves, cumin, pepper, salt, and broth, then bring the pot to a gentle simmer. Keep it uncovered so steam escapes and the liquid reduces into something slightly glossy and concentrated. Stir now and then so nothing catches on the bottom. If the heat is too high, the broth reduces before the beans have a chance to take on flavor, and you end up with salty liquid instead of a cohesive side dish.
Mashing for Texture, Not Purée
Once the beans are tender and the broth has thickened a little, mash about a quarter of them against the side of the pot. That gives you creaminess without losing the shape of the beans. Stop as soon as the liquid looks lightly thickened and the spoon leaves a trail for a second before closing back in. If the beans still look soupy, keep simmering a few more minutes before mashing more.
Finishing With Lime and Cilantro
Take the pot off the heat before you add the lime juice and cilantro. Lime tastes sharper and cleaner when it isn’t cooked, and cilantro keeps its fresh edge only if it goes in at the end. Taste after the lime goes in, because acid changes how salt reads on the tongue. A final pinch of salt often brings the whole pot into balance.
Three Ways to Adjust These Beans for the Table You’re Serving
Make Them Vegetarian or Vegan
Use vegetable broth and you’re set. The beans still come out rich because the olive oil and the long simmer do the heavy lifting, and you won’t miss the chicken broth at all once the lime and cilantro go in.
Make Them Thicker for Burritos and Bowls
Let the beans simmer uncovered for a few extra minutes and mash closer to half of them. You’ll lose a little of the loose, spoonable texture, but you gain a thicker bean base that stays put inside tortillas and under rice.
Make Them Milder for Kids or Heat-Sensitive Guests
This recipe isn’t spicy to begin with, but if you’re serving it with hotter dishes, keep the cumin at the listed amount and go light on black pepper. The lime still gives brightness without adding heat, so the beans stay lively rather than bland.
Storage and Reheating
- Refrigerator: Store in an airtight container for up to 5 days. The beans thicken as they sit, which is normal.
- Freezer: They freeze well for up to 3 months. Cool completely first, then freeze in flat, meal-sized portions for faster thawing.
- Reheating: Warm gently on the stove over low heat with a splash of broth or water. The common mistake is blasting them over high heat, which dries out the edges before the center loosens.
Answers to the Questions Worth Asking
Restaurant Style Black Beans
Ingredients
Equipment
Method
- Heat the olive oil in a large pot over medium heat. Add the quartered onion and cook for 2 minutes, stirring occasionally until slightly softened.
- Add the minced garlic and cook for 1 minute until fragrant. Keep it moving so the garlic doesn’t brown.
- Add the drained black beans, bay leaves, cumin, black pepper, salt, and broth to the pot. Bring everything to a simmer and bubble gently.
- Cook uncovered for 20 minutes, stirring occasionally. Watch for the beans to look glossy and the liquid to reduce slightly.
- Mash about 1/4 of the beans against the side of the pot to create a creamy consistency while keeping some beans whole. Stop when the mixture looks creamy but still has visible bean pieces.
- Taste and adjust seasonings with lime juice. Add more as needed until the flavor pops.
- Remove the bay leaves and stir in the chopped cilantro. Serve hot with a bright green garnish on top.