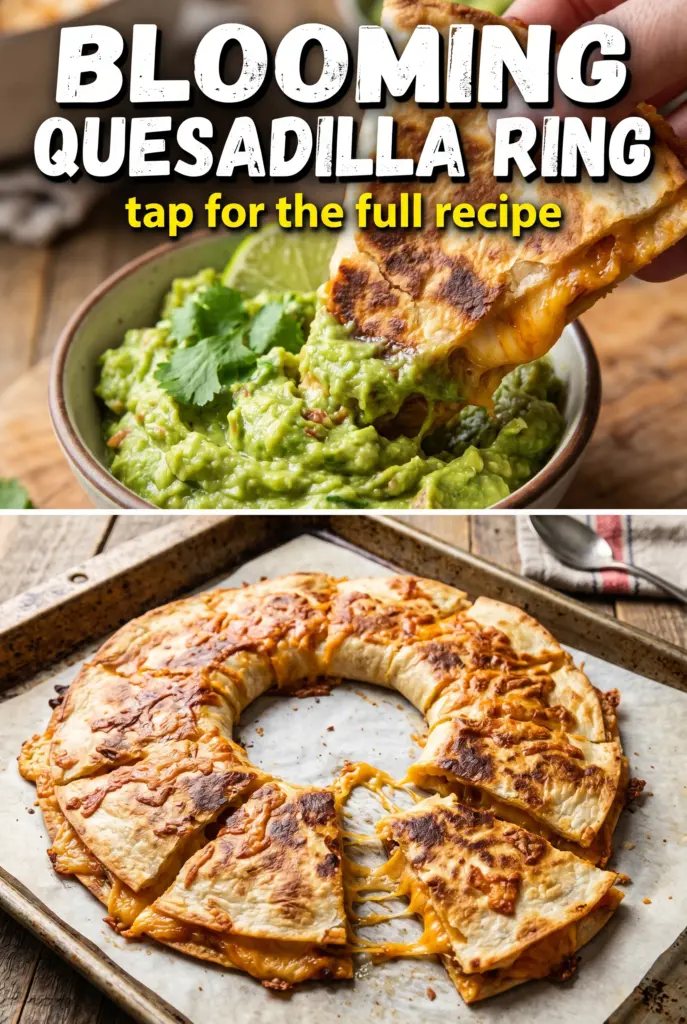
Warm, crisp quesadilla wedges arranged into a blooming ring are the kind of appetizer that disappears fast because every piece hits the table with melted cheese, savory beef, and enough color to make the platter look as good as it tastes. The edges turn deeply golden in the skillet, the filling stays tucked inside, and the final circle of triangles gives you that party-friendly pull-apart moment people always crowd around.
What makes this version work is the balance between structure and filling. The tortillas get folded before slicing, which keeps the layers tidy and helps the triangles hold their shape when they hit the pan. A mix of cheddar, seasoned beef, peppers, onion, and corn gives you enough moisture and heft without turning the quesadillas soggy. The goal is a crisp shell with a molten center, not a greasy skillet situation.
Below, you’ll find the little details that matter: how to keep the filling from escaping, when to stop adding heat so the cheese melts without burning the tortillas, and a few smart ways to adapt the ring for different crowds.
The triangles held together perfectly, and the cheese got melty without leaking all over the pan. I used the sour cream and salsa mix in the center and everyone kept dipping the crispy edges straight into it.
Save this blooming quesadilla ring for parties, game nights, and the kind of appetizer spread that needs a crispy, cheesy centerpiece.
The Trick to Keeping the Ring Crispy Instead of Soggy
The part that trips people up here isn’t the folding. It’s moisture. If the filling is wet, the tortillas steam before they crisp, and the ring turns limp before it ever makes it to the platter. That means the beef should be fully cooked and well drained, the vegetables diced small, and the salsa saved for the center dip instead of being mixed into the filling.
Cheddar matters too. Pre-shredded cheese works, but freshly shredded cheddar melts more smoothly and gives you those stretchy seams between layers. The goal is enough cheese to glue the filling together without flooding the tortilla. If you’re generous with the filling, keep it centered and leave a clean border around the edge so the fold seals neatly and the triangles don’t burst in the skillet.
- Cooked ground beef — Use beef that has already been browned and seasoned before it goes into the tortilla. If it’s still juicy, drain it well; extra liquid is what makes the quesadilla collapse.
- Cheddar cheese — Sharp cheddar gives the strongest flavor, and it melts with enough body to hold the ring together. Monterey Jack will melt more smoothly if that’s what you have, but the flavor will be milder.
- Bell peppers, onion, and corn — These add color and crunch, but they need to be diced small so the tortilla folds flat. Large pieces create gaps that leak cheese during frying.
- Sour cream and salsa — Keep these as the center dip. Mixing them into the filling adds too much moisture, but together they make a cool, tangy contrast to the hot quesadilla wedges.
How to Build the Quesadilla Ring Without Losing the Filling
Filling the Tortillas
Lay each tortilla flat and spread the cheese first, then the beef and vegetables, so the cheese can act as the glue when it melts. Keep the filling in a mound slightly off center if you want a cleaner fold, and don’t overload the tortilla; too much filling is the fastest way to get torn seams and escaped cheese. Fold it in half firmly, then slice into triangles with a sharp knife or pizza cutter so the layers stay stacked.
Frying to a Deep Golden Edge
Heat a thin film of oil over medium-high heat until it shimmers, then add the triangles in batches with the folded edge down first. That first contact helps seal the quesadilla before the cheese gets a chance to ooze out. Cook until the underside is deep golden and the cheese is visibly melted when you lift a corner, then flip and finish the second side. If the pan is too hot, the tortilla burns before the cheese melts, so lower the heat if the color is darkening too fast.
Assembling the Bloom
Stand the cooked triangles on a platter with the pointed ends facing outward and overlap them slightly so they form a full circle. This is the moment that gives the appetizer its showy shape, so keep the wedges snug but not packed tight enough to trap steam. Put the sour cream and salsa mixture in the center while it’s still thick and cool, then set the warm queso dip beside the platter so guests can choose their dip style.
How to Adapt the Ring for Different Crowds
Make It Vegetarian
Swap the beef for black beans, sautéed mushrooms, or a mixture of both. You still want the filling to be hearty and fairly dry, so cook off any mushroom moisture before assembling. The flavor stays savory and satisfying, but the texture becomes a little softer and more tender.
Make It Gluten-Free
Use certified gluten-free tortillas and handle them gently, since they can crack faster than standard flour tortillas. Warm them slightly before filling if they feel stiff. The ring shape still works, but the wedges may be a touch more delicate when you stand them up on the platter.
Use Chicken Instead of Beef
Shredded rotisserie chicken is the fastest swap here. Toss it with a little extra seasoning so it doesn’t taste flat next to the cheese and vegetables. The quesadillas cook the same way, but the filling will be a little lighter and less rich than the beef version.
Storage and Reheating
- Refrigerator: Store leftover quesadilla wedges in an airtight container for up to 3 days. The tortillas soften a little as they sit, but the flavor stays good.
- Freezer: Freeze the cooked triangles in a single layer, then transfer to a freezer bag for up to 2 months. They reheat best from frozen and don’t need to be thawed first.
- Reheating: Reheat in a dry skillet or 375°F oven until the outside crisps back up and the center is hot. The common mistake is microwaving them, which makes the tortillas chewy instead of crisp.
Questions I Get Asked About This Recipe

Blooming Quesadilla Ring
Ingredients
Equipment
Method
- Layer each tortilla with shredded cheddar cheese, cooked seasoned ground beef, diced red bell pepper, diced green bell pepper, diced onion, corn, and chopped cilantro. Fold each tortilla in half, then cut into triangles so the melted-cheese layers will stay visible.
- Heat the oil in a large skillet over medium-high heat until shimmering. Cook the quesadilla triangles in batches for 2-3 minutes per side, turning when golden and crisp.
- Continue cooking 2-3 minutes per side until the edges are browned and the cheese is fully melted. Transfer the cooked triangles to a platter as you finish the batch.
- Arrange the cooked quesadilla pieces in a circular ring on a platter, standing them up slightly overlapped for the blooming look. Mix the sour cream with salsa until smooth and spoon it into the center.
- Serve immediately with warm queso dip on the side. Keep the center dip in the middle of the ring so the layers and filling colors stay the focus.