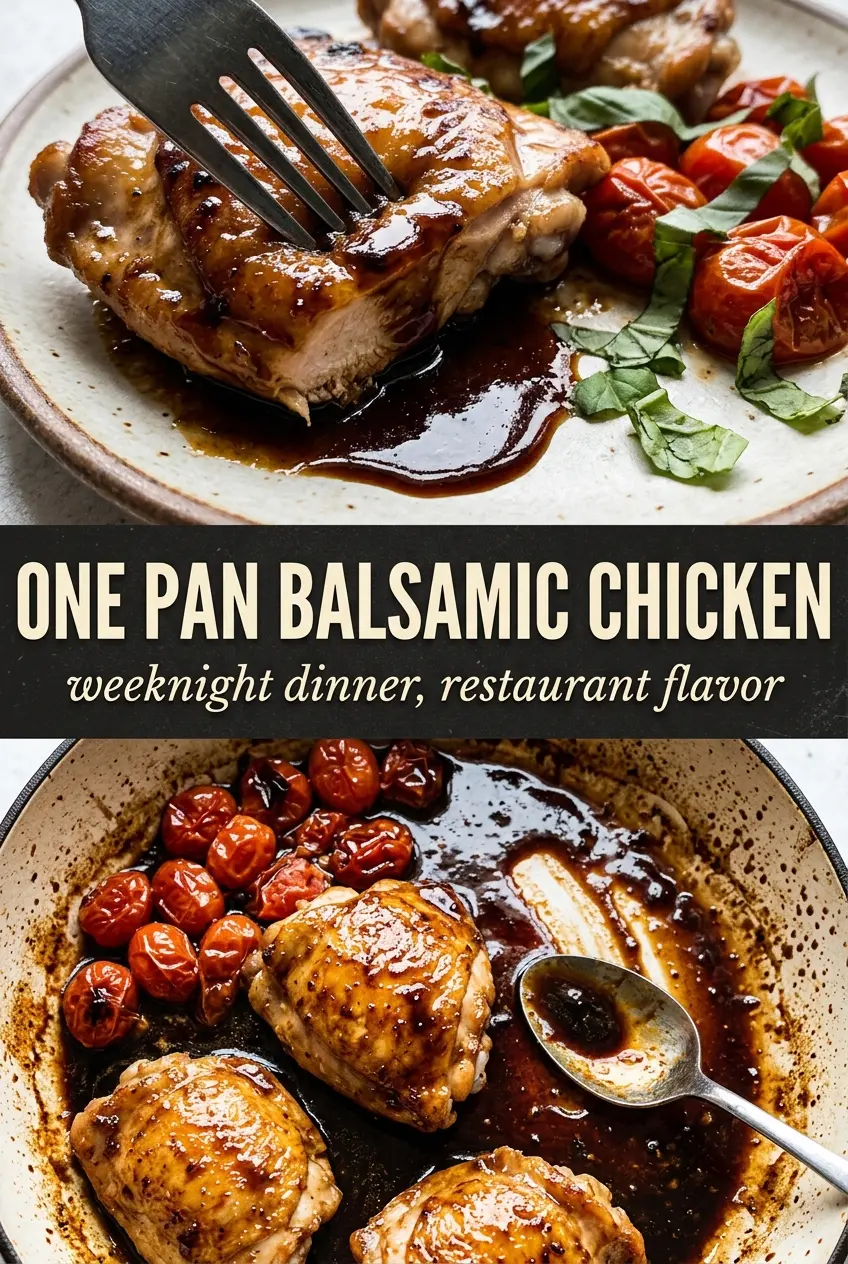
Golden chicken thighs with crisp skin and a sticky balsamic glaze earn a permanent spot on the weeknight menu fast. The pan sauce clings to the chicken instead of puddling around it, and the burst cherry tomatoes bring just enough sweetness to keep the vinegar from tasting sharp or one-note.
What makes this version work is the order. The chicken gets a hard sear first, which gives you a deeply browned base and enough rendered fat to carry the sauce. Then the balsamic, honey, and broth simmer in the same skillet, pulling up those browned bits and reducing into a glaze that tastes concentrated instead of thin and watery.
Below, I’ve included the small details that matter most here: how to get the skin crisp before the sauce goes in, what to watch for as the glaze tightens, and a few swaps that still keep the dish balanced.
The skin stayed crisp even after the sauce went in, and the balsamic reduced into this glossy glaze that coated everything instead of turning soupy.
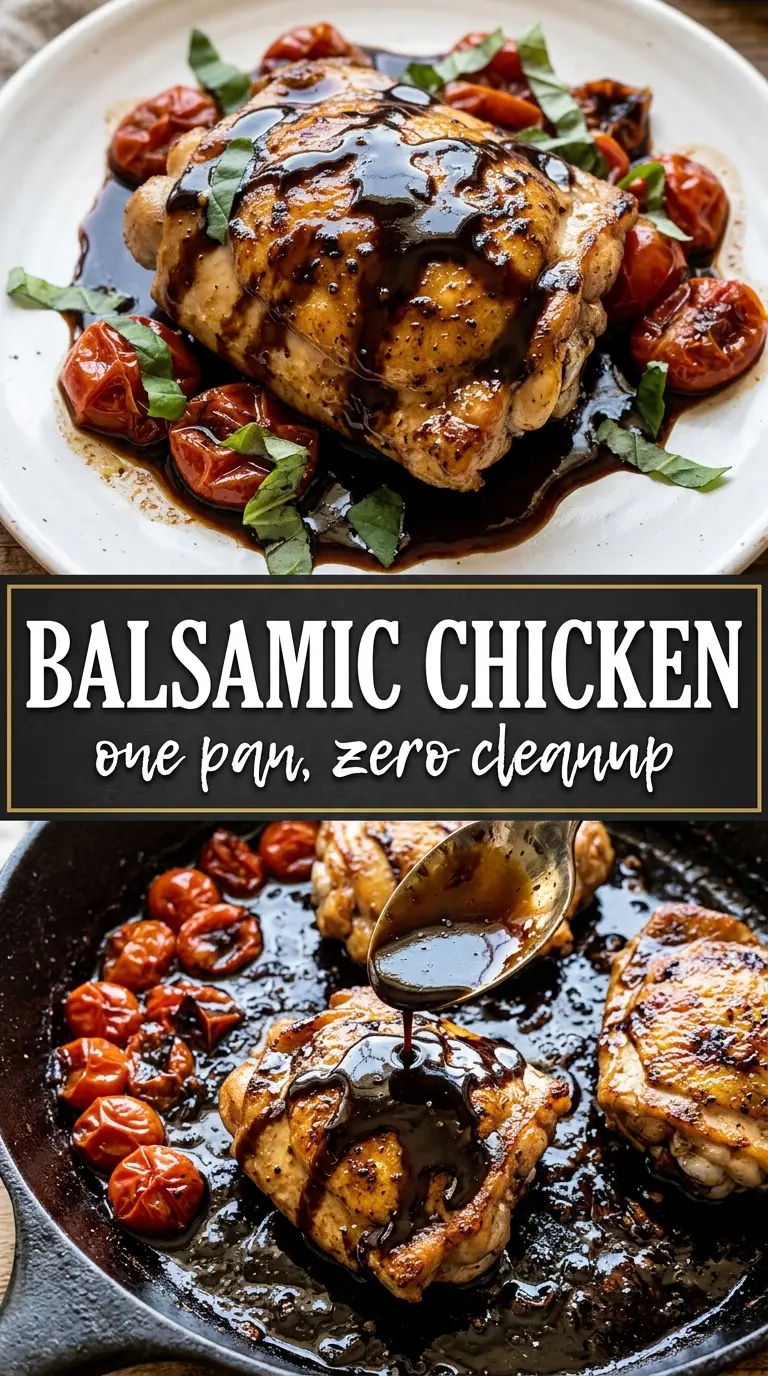
Save this one pan balsamic chicken for nights when you want crisp-skinned chicken and a glossy skillet sauce with almost no cleanup.
The Trick Is Letting the Skin Sear Before the Sauce Starts
Chicken thighs can handle the heat, and that matters here. If you rush them or crowd the pan, the skin steams instead of crisping, and once the balsamic goes in, there’s no going back. The goal is a deep golden skin that releases on its own when it’s ready, plus enough browned bits left behind to build the sauce.
The other mistake is adding the liquid too early. The glaze needs room to reduce, and it can only do that after the chicken comes out and the tomatoes have had a minute to blister. That sequence keeps the sauce glossy and concentrated instead of thin and acidic.
- Bone-in, skin-on thighs — They stay juicy through the final simmer and give you rendered fat for the sauce. Boneless thighs work in a pinch, but you’ll lose some of that rich skillet flavor and the skinless version won’t give you the same texture.
- Cast iron skillet — This recipe benefits from steady heat and good browning. Stainless steel works too, but cast iron makes it easier to get that crisp skin without having to baby the pan.
- Balsamic vinegar — Use a balsamic you’d actually taste on salad. A harsh, thin vinegar reduces into something sharp. You don’t need an expensive bottle, but you do want one that tastes balanced before it ever hits the pan.
- Honey — This softens the balsamic and helps the glaze cling to the chicken. If you swap in brown sugar, use a little less and stir well so it dissolves fully before the sauce starts to thicken.
What Each Ingredient Is Actually Doing in This Chicken Dish
- Chicken (bone-in or boneless, skin-on or skinless) — Each cut has different cooking times and flavor profiles. Let thighs reach 165°F; breasts dry out if overcooked past that.
- Sauce or braising liquid (the moisture keeper) — This prevents the chicken from drying out and adds flavor. Don’t skip it even if the recipe seems moist.
- Aromatics (garlic, onion, herbs) — These add depth and complexity. Cook them with fat so they soften and sweeten instead of staying sharp.
- Cream or butter (optional richness) — These make the dish luxurious. Add to the sauce off the boil so it stays smooth instead of breaking.
- Cheese (if using) — This adds umami and richness. Mix into the sauce or sprinkle on top; either works depending on the dish.
- Acid (lemon, vinegar, wine, or tomato) — This prevents heavy sauces from tasting flat. Add at the end so the brightness doesn’t cook off.
- Proper temperature (165°F is perfect) — Use a thermometer to avoid guessing. Pull slightly early if the chicken will rest or finish in residual heat.
- Resting time (at least 5 minutes) — This lets juices redistribute so the meat stays moist when you cut into it instead of running dry.
Building the Glaze in the Same Pan as the Chicken
Seasoning and Searing the Thighs
Season both sides generously, then place the chicken skin-side down in hot oil and leave it alone. You want to hear an active sizzle right away; if the pan is too cool, the skin sticks and turns rubbery. Seven to eight minutes usually gives you a deep golden crust, and the chicken should release easily when it’s ready to flip.
Blistering the Tomatoes and Garlic
After the chicken comes out, add the garlic and tomatoes to the same skillet and let them cook just until the tomatoes start to split and darken in spots. The garlic should soften and turn fragrant, not brown aggressively. If it scorches, the sauce will taste bitter, so keep the heat moving and use the tomatoes to help protect the garlic once they start releasing juice.
Reducing the Balsamic Sauce
Pour in the balsamic, honey, and broth, then scrape the bottom of the pan until the browned bits dissolve into the liquid. Bring it to a boil for a moment, then settle into a steady simmer so it can thicken without scorching. This is where the sauce turns from sharp to glossy, and you’ll know it’s close when it coats a spoon instead of running off in a thin sheet.
Finishing in the Glaze
Return the chicken skin-side up and cook until the thighs reach 165°F in the thickest part. Keep the skin above the sauce so it stays crisp while the glaze finishes reducing around it. Stir in the butter at the end for a smoother shine, then add the basil right before serving so it stays bright and fresh.
How to Adjust This Without Losing the Balance
Make It Gluten-Free Without Changing the Method
This recipe is naturally gluten-free as written, so there’s nothing to replace. Just check your broth to make sure it’s labeled gluten-free, since that’s the one ingredient that can sneak in unnecessary additives.
Use Boneless Chicken Thighs or Breasts
Boneless thighs cook faster and stay forgiving, but they won’t give you the same dramatic skin or richness. If you use breasts, cut the simmer time down and pull them as soon as they hit 165°F so they don’t dry out while the sauce finishes.
Skip the Honey and Go Less Sweet
If you like a sharper balsamic glaze, reduce the honey to 1 tablespoon or leave it out and add a small splash more broth. The sauce will taste more tangy and less lacquered, so expect a thinner finish and a little less cling on the chicken.
Storage and Reheating
- Refrigerator: Store leftovers in an airtight container for up to 4 days. The skin softens as it sits, but the sauce stays bold and the chicken stays juicy.
- Freezer: Freeze for up to 2 months. The texture of the tomatoes softens after thawing, but the dish still holds up well if you want a make-ahead dinner.
- Reheating: Warm gently in a covered skillet over low heat with a splash of broth. High heat dries out the chicken and can make the glaze turn sticky in the wrong way before the center is hot.