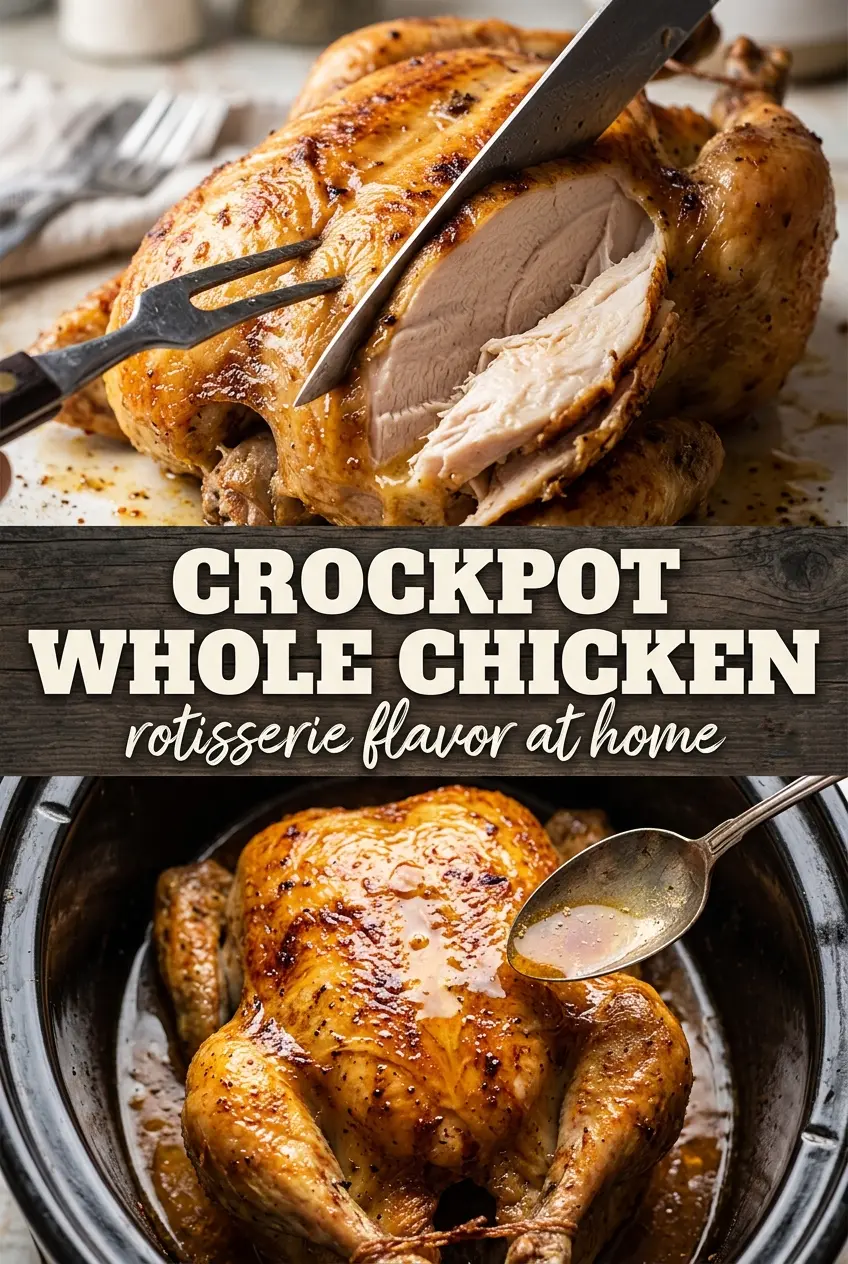
Slow cooker whole chicken comes out tender enough to pull apart with a fork, but the part that keeps this recipe in regular rotation is the skin. A quick broil at the end gives you that deeply seasoned, golden top that a slow cooker can’t deliver on its own, so you get the best of both worlds: juicy meat and actual texture. The lemon, garlic, and thyme do their job quietly in the cavity, turning the chicken fragrant from the inside out without making it taste overloaded.
The key is treating the slow cooker like a gentle oven, not a steam bath. A foil rack keeps the bird out of the juices so the skin doesn’t sit and soften all day, and the spice rub goes on before the lemon and herbs so the seasoning has a chance to cling to the fat and skin. I’ve found that smoked paprika does a lot of work here; it adds color, a little depth, and the look of a roast chicken even before it goes under the broiler. Below, I’ve included the one step that changes the skin the most, plus a few ways to adjust this if you want a different herb profile or need to stretch it into more than one meal.
The chicken was fall-apart tender, and the skin actually crisped up under the broiler instead of staying rubbery like other crockpot recipes I’ve tried. The lemon and garlic made the whole house smell amazing.
Like this crockpot whole chicken? Save it to Pinterest for juicy meat, golden skin, and an easy one-pot dinner that still feels special.
The Trick to Crisp Skin on a Slow Cooker Chicken
The biggest mistake with crockpot whole chicken is letting the bird sit directly in the cooking liquid. That traps steam against the skin all day, and steam is the enemy of browning. The foil balls under the chicken lift it just enough so the heat can circulate, which helps the skin dry out instead of turning soft and pale.
The other piece that matters is the finish. The chicken will be cooked through in the slow cooker, but it won’t look like a roast until it spends a few minutes under the broiler. That last blast of high heat pulls the skin from soft and seasoned to crackly and deeply colored, and it only works if you broil immediately after the chicken comes out of the pot while the skin is still hot and rendered.
- Whole chicken — A 4- to 5-pound bird is the sweet spot here. Smaller chickens can dry out by the end of the long cook, and larger ones may need more time than the seasoning rub can handle without the skin getting too soft.
- Smoked paprika — This is what gives the chicken its roast-like color and a little smoky depth. Regular paprika works in a pinch, but the smoked version makes the finished bird look and taste more developed.
- Softened butter or olive oil — You need a fat that will cling to the skin and help the spices adhere. Butter gives a richer finish; olive oil keeps the flavor cleaner and a little lighter.
- Lemon and garlic — These go in the cavity, not on the skin, so they perfume the chicken from the inside without burning during the long cook. If you only have one lemon, use it; the acid is there for aroma more than sharpness.
- Fresh thyme sprigs — Dried herbs carry the rub, but fresh thyme in the cavity gives a fresher, more layered finish. If you don’t have it, use a few extra pinches of dried thyme.
What Each Ingredient Is Actually Doing in This Slow Cooker Chicken

- Chicken (boneless or bone-in) — Both work beautifully. Boneless finishes faster; bone-in creates richer broth. Cut evenly so pieces cook at the same rate.
- Sauce or liquid (cream, broth, or seasoned base) — This is what keeps the chicken moist during long cooking. Don’t skip it or the chicken gets dry.
- Aromatics (garlic, onion, herbs) — These mellow and sweeten during 6-8 hours of slow cooking. Mince finely so they distribute throughout.
- Seasonings (salt, spices, Italian seasoning) — Season boldly because slow cooking can mute flavors. Taste before serving and adjust if needed.
- Vegetables (if using) — Cut to size and layer them. Harder vegetables like potatoes go in first; softer ones later.
- Cheese (if using) — Add near the end so it melts smoothly. Cooking too long can make it separate or get grainy.
- Acid (lemon, lime, vinegar, wine) — This wakes up flavors that slow cooking can dull. Add in the last hour so the brightness doesn’t cook off.
- Low heat for 6-8 hours (the patience that pays off) — Low heat is gentler and more forgiving than high. The chicken stays tender and pulls apart easily.
Getting the Chicken Tender Without Losing the Skin
Seasoning the Bird
Mix the spices first so the paprika, herbs, and garlic powder are evenly distributed before they hit the chicken. Rub the olive oil or softened butter all over the skin, including under the wings and around the legs, then press the spice mix on in an even layer. If the chicken looks patchy, it usually means the skin was still damp; pat it dry before you start so the seasoning sticks instead of sliding off.
Building the Aromatic Center
Stuff the cavity with the lemon halves, smashed garlic, and thyme sprigs. Don’t pack them tightly; you want them resting inside the bird, not jammed in so the heat can’t move through the center. The cavity aromatics don’t season the meat like a brine would, but they do keep the chicken smelling and tasting full and round instead of flat.
Slow Cooking to the Right Temperature
Set the chicken breast-side up on the foil rack and cook on low until the thickest part of the thigh reaches 165°F. The low setting matters because high heat can make the meat stringy before the skin has a chance to hold up. If the juices pool heavily around the bird, that’s normal; don’t lift the lid repeatedly, since every peek drops the temperature and adds time.
Broiling for the Finish
Move the chicken to a broiler-safe pan and broil for 3 to 5 minutes until the skin is blistered and golden. Watch it closely, because the line between bronzed and burnt is short under a broiler. Pull it as soon as the top looks lacquered and the edges of the skin have started to crisp; the bird will keep steaming for a minute after it comes out.
How to Change This Crockpot Chicken Without Losing the Point
Dairy-Free Version
Use olive oil instead of butter. You’ll lose a little richness, but the spice rub still adheres well and the chicken still finishes with a clean, savory flavor. This is the easiest swap in the recipe because the butter is helping with texture more than structure.
Herb Swap for a Different Finish
Trade the thyme and rosemary in the rub for oregano and a little sage if you want a more savory, slightly earthier bird. Keep the paprika and garlic as they are so the color and base flavor stay balanced. The result feels different without changing the cooking method at all.
Turning It Into Two Meals
Pull the meat from the bones after the chicken rests and save the cooking juices for drizzling over the meat or rice. The flavor gets even better the next day, and the carcass can go straight into a stock pot if you want to stretch it into soup. This is the smartest way to make one whole chicken feed more people without adding extra work.
Storage and Reheating
- Refrigerator: Store the carved chicken in an airtight container for up to 4 days. The skin softens, but the meat stays juicy.
- Freezer: Yes, the meat freezes well for up to 3 months. Freeze it in portions with a spoonful of cooking juices so it doesn’t dry out.
- Reheating: Warm it covered in a 325°F oven with a splash of broth or the reserved juices until hot. The common mistake is blasting it in the microwave, which turns the meat stringy and pulls out the moisture you worked to keep in.
Questions I Get Asked About This Recipe
Crockpot Whole Chicken
Ingredients
Equipment
Method
- Combine smoked paprika, garlic powder, onion powder, dried thyme, dried rosemary, salt, and black pepper in a small bowl until evenly mixed.
- Rub olive oil or softened butter all over the chicken, then coat thoroughly with the spice rub, pressing lightly so it adheres (visual cue: fully covered skin).
- Stuff the cavity with lemon halves, smashed garlic, and fresh thyme sprigs (visual cue: cavity packed with aromatics).
- Ball up 4–5 pieces of aluminum foil and place in the bottom of the slow cooker to act as a rack (visual cue: a raised platform that keeps the chicken off the base).
- Place chicken breast-side up on top of the foil rack so it sits upright for even cooking.
- Cook on low for 7–8 hours until the internal temperature reaches 165°F in the thickest part of the thigh (visual cue: juices run clear when pierced at the thigh).
- Broil for 3–5 minutes to crisp the skin before carving and serving (visual cue: skin turns deeper golden and slightly blistered).