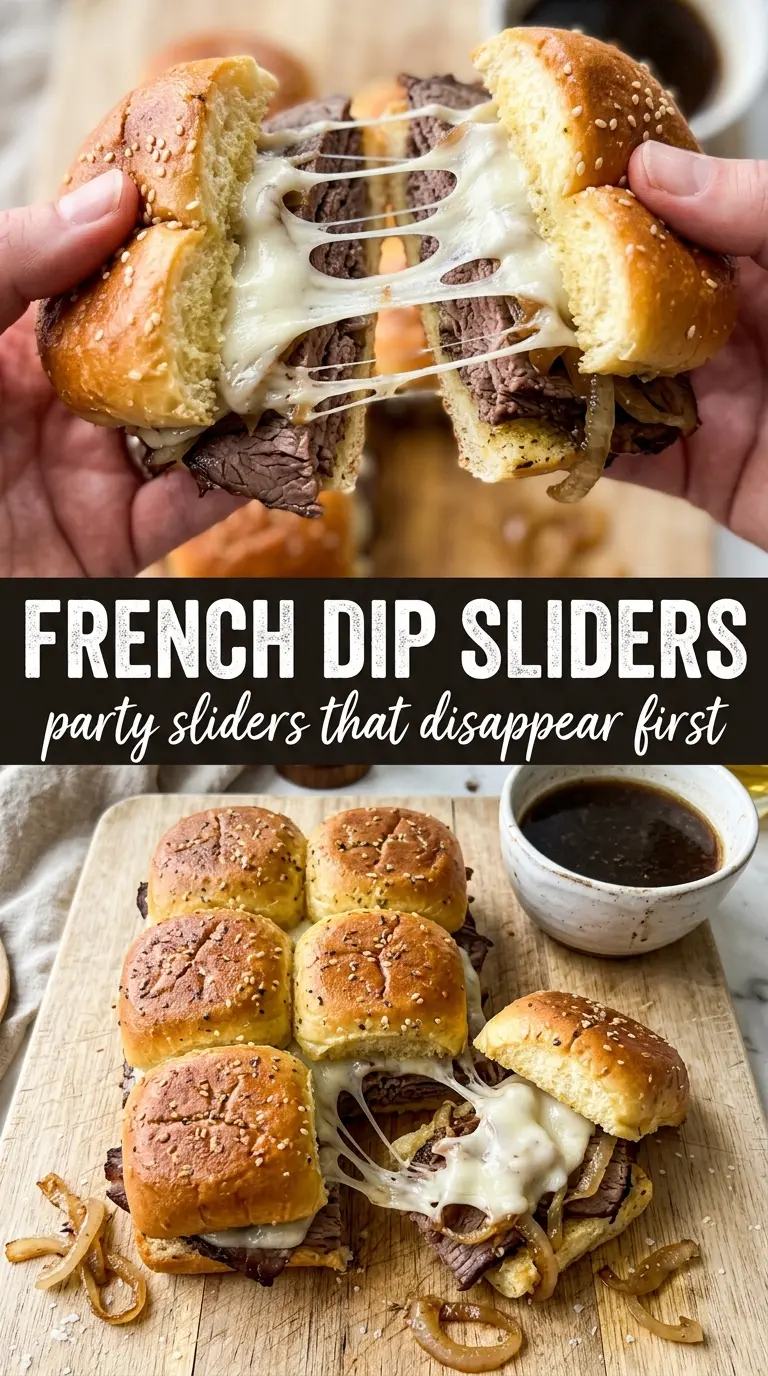
French dip sliders bake up into the kind of tray that disappears before the pan even cools. The rolls turn soft underneath, the tops go glossy and golden, and the roast beef warms through just enough to stay tender instead of dry. Pull one apart and you get melted provolone clinging to the beef, with a dark, savory au jus waiting on the side for the dunk that makes the whole thing click.
The trick here is balance. Hawaiian rolls bring a little sweetness, so the butter topping needs Worcestershire, garlic, onion, and parsley to keep the flavor grounded and savory. The roast beef goes in thin and even, which helps the sliders heat quickly without turning chewy, and the brief covered bake keeps the cheese melted before the tops have a chance to overbrown.
Below, I’ve included the small details that make these sliders hold together cleanly, plus a few smart swaps and storage notes if you want to make them ahead for a crowd.
The rolls stayed soft underneath but the tops got perfectly crisp, and the au jus tasted way better than I expected from broth alone. I made these for game day and the pan was gone in minutes.
Save these French dip sliders for the next time you need a melty roast beef appetizer with real au jus for dipping.
The Part That Keeps the Sliders from Going Soggy
The biggest mistake with French dip sliders is letting the bread absorb too much moisture before it ever hits the oven. These work because the roast beef is tucked between the roll halves and the butter goes on top, not inside the sandwich. That keeps the bottoms soft enough to bite through without collapsing into a damp layer.
Another detail that matters is the bake time under foil. The covered portion heats the beef and melts the cheese first, which means the rolls don’t have to stay in the oven long enough to dry out. Then the foil comes off just long enough to give you that burnished top and keep the sliders from tasting steamed.
- Hawaiian sweet rolls — The soft, slightly sweet rolls are what make these sliders feel classic. Regular dinner rolls will work, but you’ll lose some of that sweet-salty contrast. If you swap them, pick rolls that are sturdy enough to slice as a whole slab.
- Deli roast beef — Thinly sliced roast beef heats fast and stays tender. If the slices are thick or curled, chop them lightly with a knife before layering so the sliders don’t pull apart awkwardly when you serve them.
- Provolone — Provolone melts smoothly and brings the mild, savory flavor you want here. Mozzarella melts too, but it tastes flatter; Swiss gives a sharper French dip feel if that’s what you like.
- Butter topping — This is more than just a finish. The Worcestershire, garlic powder, onion powder, and parsley turn plain melted butter into the flavor that ties the whole pan together.
What Each Ingredient Is Actually Doing in These Sandwiches
- Bread (the vessel) — Choose sturdy enough to hold the filling without falling apart. Toast lightly so it doesn’t absorb too much moisture.
- Protein (meat, pulled beef, or roasted chicken) — This is the star. Cook it with enough fat so it stays tender instead of drying out.
- Sauce (au jus, mayo, mustard, or cheese sauce) — This adds moisture and flavor. Don’t overdo it or the bread gets soggy.
- Vegetables (onions, peppers, lettuce, tomato) — These add freshness and crunch. Layer them so flavors distribute evenly.
- Cheese (if using) — Let it melt slightly over the warm meat so it adheres instead of sliding out when you bite.
- Toppings (pickles, jalapeños, caramelized onions) — These add personality and contrast. Don’t skip them or the sandwich feels boring.
- Assembly timing (warm filling, cool bread) — Build sandwiches when the filling is still hot so the bread softens slightly and the cheese melts properly.
- Serving immediately (the most important step) — Don’t let sandwiches sit or the bread absorbs all the sauce and gets soggy. Serve hot right away.
Building the Sliders So the Cheese Melts Before the Tops Brown
Assemble the Roll Base
Slice the rolls in half horizontally without separating them into individual buns, then set the bottom slab in a greased 9×13 dish. That single sheet makes the sliders easier to build and easier to serve. Layer the roast beef evenly so every slider gets the same filling, and don’t pile it so high that the top half slides around.
Brush the Butter on Top
Whisk the melted butter with Worcestershire, garlic powder, onion powder, and parsley, then brush it generously over the top rolls. Get the edges too, because those are the pieces that brown first. If you dump the butter on in one spot, the tops will bake unevenly and some sections will taste dry.
Bake Covered, Then Uncover
Cover the dish with foil and bake for 15 minutes, then uncover and bake 5 minutes more. The foil trap keeps steam in just long enough to melt the provolone all the way through. If the tops are browning too fast, leave the foil on for another couple of minutes and uncover only at the end.
Simmer the Au Jus
While the sliders bake, simmer the beef broth with Worcestershire, soy sauce, and garlic powder for about 5 minutes. You want it hot, savory, and slightly reduced, not salty and syrupy. Taste it before serving; if it seems flat, it usually needs another minute or two on the stove, not more soy sauce.
How to Change These French Dip Sliders Without Losing the Point
Use Swiss Instead of Provolone
Swiss gives you a sharper, more traditional French dip flavor. It melts a little less lazily than provolone, but it still works well if you want the sliders to taste more like a diner sandwich than a deli melt.
Make Them Gluten-Free
Use gluten-free slider rolls and swap in a gluten-free Worcestershire sauce and soy sauce. The filling and au jus stay the same, but the rolls may brown a little faster, so check them a minute or two early.
Turn Them Into a Heartier Dinner
Add a thin layer of caramelized onions under the beef if you want more sweetness and depth. They add time, but they also make the sliders taste richer and a little closer to a full French dip sandwich.
Storage and Reheating
- Refrigerator: Store leftovers covered for up to 3 days. The rolls soften a bit as they sit, but the flavor holds up well.
- Freezer: The baked sliders freeze, but the bread texture gets softer after thawing. For best results, freeze them tightly wrapped, then thaw in the fridge before reheating.
- Reheating: Warm in a 325°F oven, covered with foil, until heated through. Microwaving makes the bread rubbery and the cheese uneven, so the oven gives you the closest result to fresh.
Questions I Get Asked About This Recipe

French Dip Sliders
Ingredients
Equipment
Method
- Preheat the oven to 350°F, then grease a 9x13 baking dish to prevent sticking.
- Slice the Hawaiian rolls in half horizontally without separating the individual rolls, then place the cut bottoms into the dish.
- Layer the roast beef and provolone cheese evenly over the roll bottoms, then place the roll tops on.
- Whisk the melted butter with Worcestershire, garlic powder, onion powder, and chopped parsley until blended, then brush generously over the roll tops.
- Cover with foil and bake for 15 minutes, until the rolls are warmed through and starting to set.
- Uncover and bake for 5 more minutes at 350°F until the tops are golden.
- Simmer the beef broth with Worcestershire, soy sauce, and garlic powder for 5 minutes to build a dark, savory au jus.
- Serve the sliders hot with the au jus on the side for dipping.