
These cute Easter Bunny Pancake Bites are fluffy, fun, and perfect for a festive breakfast! Made with pancake batter and just the right amount of sweetness, they’ll bring smiles to the table.
Honestly, who can resist a bunny-shaped pancake? I love stacking them high with whipped cream and fresh fruit—it’s like having a mini pancake party! 🐰🥞
Key Ingredients & Substitutions
All-Purpose Flour: This is the base for our pancakes, giving them structure. If you’re looking for a gluten-free option, try almond flour or a gluten-free flour blend. They may alter texture slightly, but they’re great alternatives.
Buttermilk: Buttermilk adds a lovely tang and makes pancakes fluffy. If you don’t have it, mix 3/4 cup of milk with 1 tablespoon of white vinegar or lemon juice and let it sit for 5 minutes to mimic buttermilk.
Sugar: Using regular granulated sugar works perfectly. For a different sweetness, you can substitute with brown sugar, giving your pancakes a slight molasses flavor.
Whipped Cream: This creates the bunny ears! You could use store-bought whipped cream or, for a healthier option, try coconut whipped cream or whipped yogurt.
Chocolate Chips: Regular chocolate chips are great, but mini chocolate chips or even M&M’s can add a fun twist. If you’re avoiding chocolate, use colored candy or fruit pieces for eyes.
How Do I Make Fluffy Pancakes Without Overmixing?
Mixing the batter just right is crucial for fluffy pancakes. Overmixing activates gluten, leading to tough pancakes. Here’s how to avoid that:
- Combine dry and wet ingredients in separate bowls before mixing.
- When mixing them together, use a gentle folding motion until you see no dry flour. It’s okay if there are small lumps; they’ll help keep your pancakes light.
- Let the batter rest for about 5 minutes. This helps the flour hydrate and the baking powder to start working, creating fluffier pancakes.
By following these steps, you’ll set yourself up for pancake success, making your Easter Bunny Pancake Bites a delightful treat!
How to Make Easter Bunny Pancake Bites
Ingredients You’ll Need:
For the Pancakes:
- 1 cup all-purpose flour
- 1 tbsp sugar
- 1 tsp baking powder
- 1/2 tsp baking soda
- 1/4 tsp salt
- 3/4 cup buttermilk
- 1 large egg
- 2 tbsp melted butter
- 1/2 tsp vanilla extract
For the Decorations:
- Whipped cream (for bunny ears)
- Pink icing or frosting (for inner ears and nose)
- Chocolate chips or chocolate candy melts (for eyes)
- Chocolate syrup or melted chocolate (for whiskers)
- Strawberries (for garnish)
- Baby carrots with green tops (for garnish)
How Much Time Will You Need?
This fun recipe takes about 20 minutes to prepare and cook. You’ll be whipping up the batter in no time and can enjoy your delicious Easter Bunny Pancake Bites in less than half an hour!
Step-by-Step Instructions:
1. Mix the Dry Ingredients:
In a large bowl, whisk together the flour, sugar, baking powder, baking soda, and salt. This blends all your dry ingredients nicely!
2. Combine the Wet Ingredients:
In another bowl, whisk together the buttermilk, egg, melted butter, and vanilla extract. Make sure everything is well mixed so your pancakes come out tasty!
3. Combine Wet and Dry Ingredients:
Now, pour your wet mixture into the bowl of dry ingredients. Gently stir them together until just combined. Remember, it’s okay if there are a few lumps; don’t overmix!
4. Heat the Skillet:
Place a non-stick skillet or griddle over medium heat. Lightly grease it with a little butter or oil so the pancakes won’t stick.
5. Cook the Pancakes:
Pour about 1/4 cup of pancake batter onto the skillet for each pancake. Cook until bubbles form on the surface and the edges look set, which will take about 2-3 minutes. Flip the pancakes and cook for another 1-2 minutes until they’re golden brown. Keep cooking until all your pancake batter is gone!
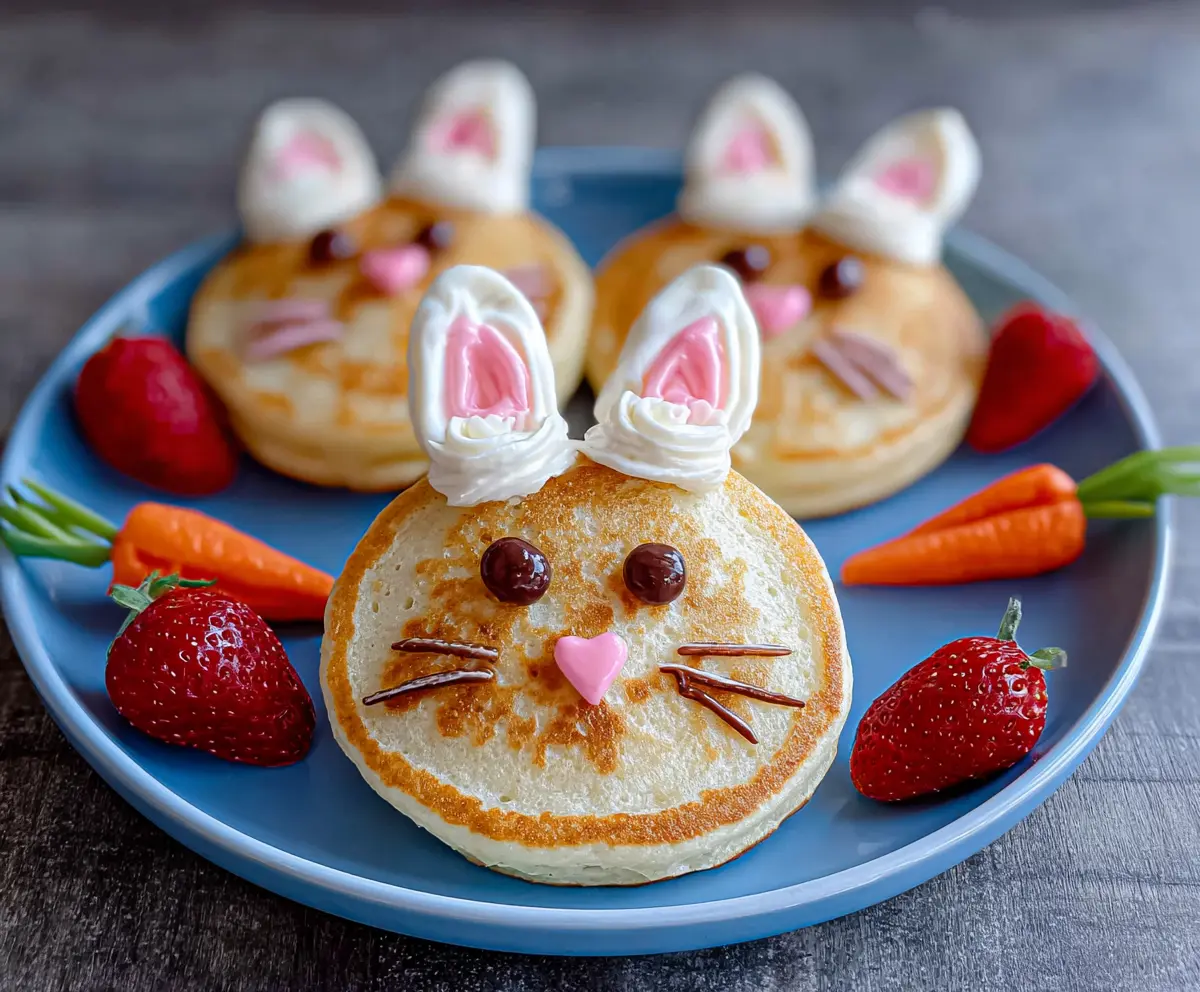
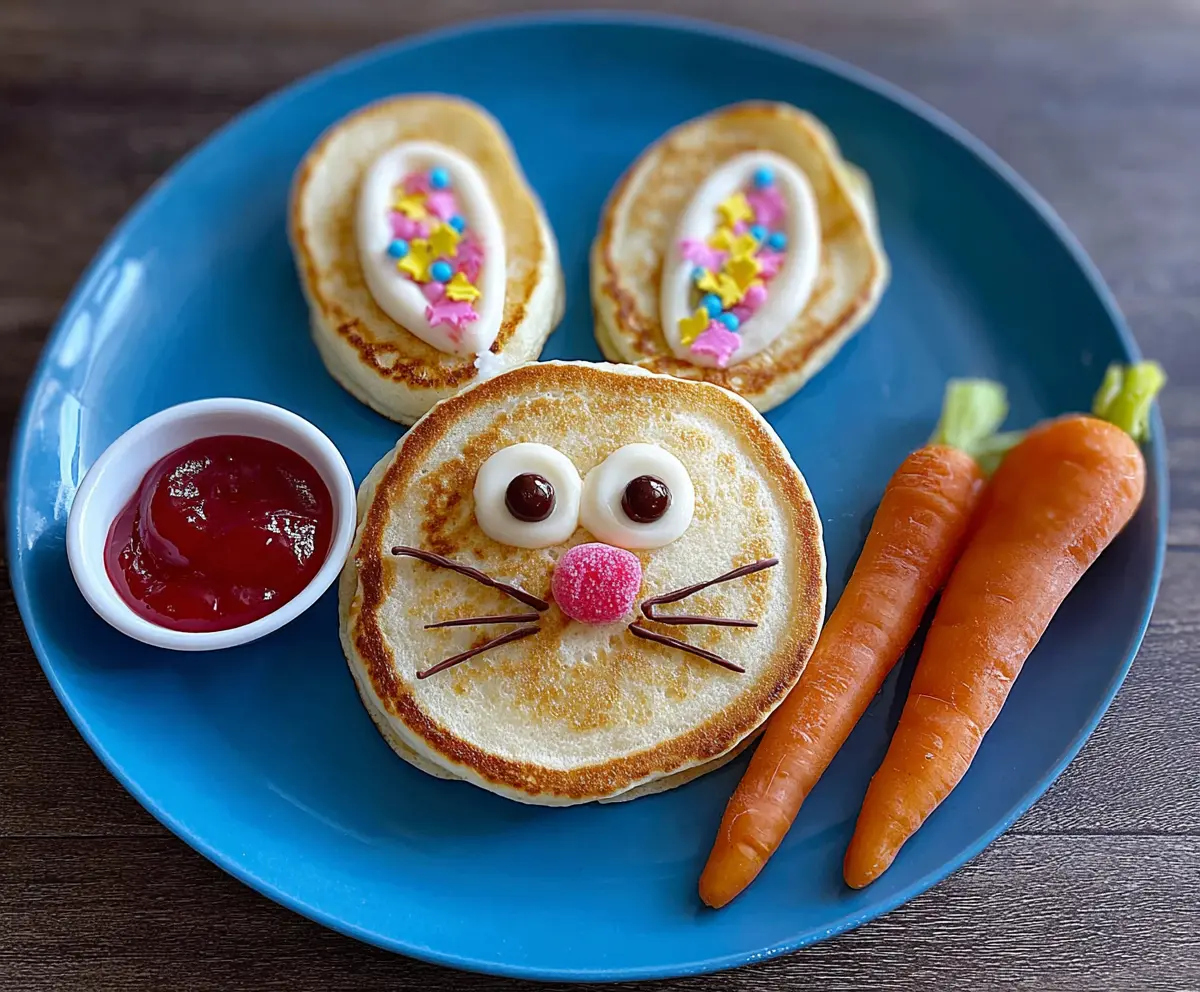
6. Create Bunny Ears:
Place the cooked pancakes on a serving plate. Using whipped cream, pipe two upward points at the top of each pancake to make bunny ears. Get creative!
7. Add Inner Ear Details:
Fill the center of each whipped cream ear with pink icing or frosting to mimic the little inner ears of a bunny. Adorable!
8. Make the Eyes:
Use chocolate chips or chocolate candies to create the bunny’s eyes. Just press them gently into the top front of each pancake.
9. Add the Bunny Nose:
Piping a small pink heart or triangle shape below the eyes with pink icing will resemble the bunny’s cute little nose.
10. Create Whiskers:
Using chocolate syrup or melted chocolate in a piping bag, or a zip-top bag with the corner snipped off, pipe thin whiskers on each side of the nose.
11. Garnish for a Fun Presentation:
To complete your bunny scene, garnish the plate with fresh strawberries and baby carrots with green tops, representing your bunny’s favorite snacks!
12. Serve and Enjoy:
Your festive Easter Bunny Pancake Bites are ready! Serve them immediately to family and friends and enjoy this delightful holiday treat!
Can I Use Regular Milk Instead of Buttermilk?
Yes, you can! If you don’t have buttermilk, simply mix 3/4 cup of regular milk with 1 tablespoon of white vinegar or lemon juice. Let it sit for about 5 minutes to curdle slightly, mimicking the tanginess of buttermilk.
What Can I Substitute for Eggs in This Recipe?
If you need an egg substitute, use 1/4 cup of unsweetened applesauce or mashed banana for each egg. This will keep your pancakes moist and delicious without using eggs!
How Should I Store Leftover Pancake Bites?
Store any leftover pancake bites in an airtight container in the refrigerator for up to 3 days. To reheat, simply warm them in the microwave or on a skillet until heated through.
Can I Freeze These Pancake Bites?
Absolutely! Allow the pancakes to cool completely, then stack them with a sheet of parchment paper in between each pancake and store in a freezer-safe bag. They’ll last for up to 2 months in the freezer. To reheat, simply thaw in the fridge overnight and warm in the microwave or toaster.