Cream Cheese Taco Dip comes out thick, salty, and scoopable, with a hot layer of seasoned beef sitting over cool, tangy cream cheese and a cap of melted cheddar that pulls into little strings on the chip. It disappears fast because every bite has a little of everything: creamy, savory, a touch of heat, and enough richness to feel like a proper appetizer, not just a snack.
The trick is keeping the layers distinct. Softened cream cheese spreads cleanly and gives you that firm, cool base instead of a lumpy bottom layer, while the beef mixture needs to be cooked down enough that it’s saucy but not watery. Salsa adds moisture and tang, but if you use too much or skip draining the beef, the whole dish turns greasy and loose instead of staying neatly layered.
Below, you’ll find the one thing that keeps this dip from getting muddy, plus a few smart swaps for making it work with different heat levels and what you have on hand.
The cream cheese layer stayed smooth, and the beef mixture wasn’t watery at all. I used mild salsa and it still had plenty of flavor — gone in about 10 minutes at our game night.
Save this Cream Cheese Taco Dip for parties, game day, and any night that needs a hot, cheesy skillet-style appetizer.
The Layering Mistake That Makes Taco Dip Watery
This dip fails when the beef carries too much moisture into the pan. Salsa and taco seasoning are meant to season the meat, not flood it, so cook the beef until it’s no longer wet-looking and drain off the fat before you add the salsa. If the mixture looks loose in the skillet, it’ll stay loose in the oven and slide around on top of the cream cheese instead of settling into a neat layer.
The other problem is cold cream cheese. Straight-from-the-fridge cream cheese tears the base and leaves little clumps that don’t melt evenly under the hot beef. Let it soften until it spreads without resistance, and use the back of a spoon or offset spatula to press it into an even layer all the way to the edges of the dish.
What Each Ingredient Is Actually Doing in This Dip
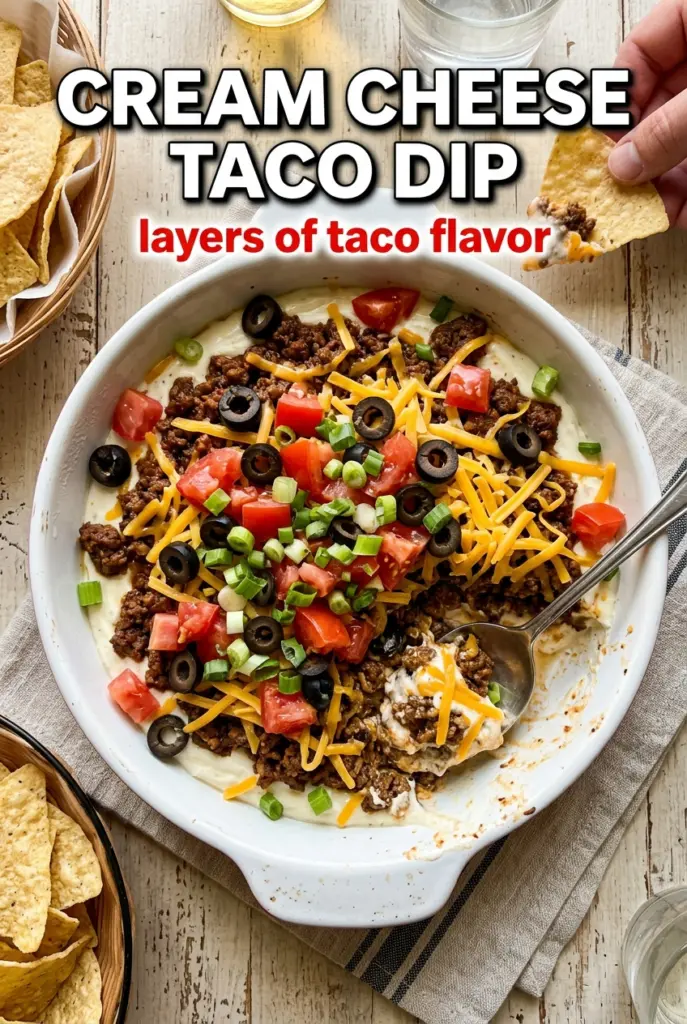
Each part has a job here, and the dip only works when those jobs stay separate and balanced. The cream cheese gives you the cool, rich base; the beef brings the hearty taco flavor; the cheddar adds that melted top layer that helps everything feel complete.
- Cream cheese — This is the base that keeps the dip dense and scoopable. Full-fat cream cheese gives the smoothest result; low-fat cream cheese can work, but it softens more and tastes less rich. Let it sit out until it’s pliable so it spreads instead of tearing.
- Ground beef — Use 80/20 if you want the best flavor, then drain well after browning. Leaner beef works too, but it needs a little more seasoning depth since it won’t bring as much built-in richness.
- Taco seasoning — A packet keeps the spice balance consistent and gives you that familiar taco flavor fast. If you’re using homemade seasoning, add enough salt and cumin to mimic the packet’s savory edge.
- Salsa — Salsa adds moisture, acidity, and a little tomato sweetness that keeps the beef from tasting flat. Thick salsa works best here; a thin, watery one makes the filling loose. If that’s what you have, simmer the meat mixture a minute or two longer before assembling.
- Cheddar cheese — Shredded cheddar melts into the top and browns at the edges. Pre-shredded is fine, but freshly shredded melts a little cleaner and gives you a smoother top.
- Jalapeños and green onions — Add these after baking so they stay bright and fresh. Baking them too long dulls the color and mutes the bite.
Building the Beef Layer So It Bakes, Not Pools
Browning the Meat Properly
Cook the ground beef over medium heat and break it into small crumbles as it browns. You want the meat to lose its pink color and start picking up a little color at the edges, because that’s where the savory flavor comes from. If liquid collects in the pan, keep cooking until it evaporates before you season anything.
Seasoning and Reducing the Filling
Stir in the taco seasoning and salsa after draining the fat. The mixture should look thick and cling to the beef, not drip off the spoon. If it seems loose, let it simmer for another minute or two so the salsa tightens up and doesn’t seep into the cream cheese layer.
Layering for a Clean Slice
Spread the softened cream cheese in an even layer in a shallow baking dish, then spoon the beef on top without pressing it down too hard. Keep the layers distinct so the cream cheese warms underneath but doesn’t vanish into the filling. Finish with cheddar in an even blanket so the top melts uniformly instead of browning in patches.
Serving While It’s Still Hot
Bake just until the cheese is melted and the edges look hot and bubbly, then top with jalapeños and green onions right away. This dip is at its best when the cream cheese is warm but still holds its shape, so don’t let it sit around in the pan for long before serving. Tortilla chips need a firm base here; thin chips will snap before they can scoop through the layers.
How to Adapt This Taco Dip for Different Crowds and Heat Levels
Milder Version for Mixed Crowds
Use mild salsa and skip the jalapeños on top. You’ll still get plenty of taco flavor from the seasoning and cheddar, but the heat stays gentle enough for kids or anyone who doesn’t want a spicy dip.
Dairy-Free Version
Swap in a dairy-free cream cheese and a good melting plant-based cheddar. The texture will be a little softer and less tangy than the original, but it still holds the layers if you use a thick salsa and don’t overload the filling with extra liquid.
Ground Turkey Instead of Beef
Ground turkey works well if you want a lighter dip, but it needs the same careful draining and seasoning as beef. Add a tablespoon of oil while browning if the pan looks dry, since turkey can taste lean if it’s cooked too bare.
Storage and Reheating
- Refrigerator: Store leftovers covered for up to 3 days. The cream cheese base firms up in the fridge, and the toppings will lose a little brightness.
- Freezer: This dip doesn’t freeze well once assembled. The cream cheese can turn grainy after thawing, and the fresh toppings won’t hold up.
- Reheating: Warm it in a 300°F oven until heated through, or reheat single portions in the microwave in short bursts. The common mistake is blasting it on high heat, which can separate the cheese and make the edges greasy before the center is warm.
Answers to the Questions Worth Asking

Cream Cheese Taco Dip
Ingredients
Equipment
Method
- Brown the ground beef in a skillet over medium heat, breaking it apart as it cooks, about 8 minutes, until no longer pink.
- Drain excess fat, then stir in taco seasoning and salsa until the mixture looks evenly coated.
- Spread the softened cream cheese in the bottom of a shallow baking dish to form an even layer.
- Top with the cooked seasoned beef mixture and spread it into an even layer over the cream cheese.
- Sprinkle shredded cheddar cheese evenly over the beef, then bake at 350°F for 15 minutes until the cheese is melted and bubbly.
- Top the hot dip with diced jalapeños and chopped green onions, then serve immediately with tortilla chips.