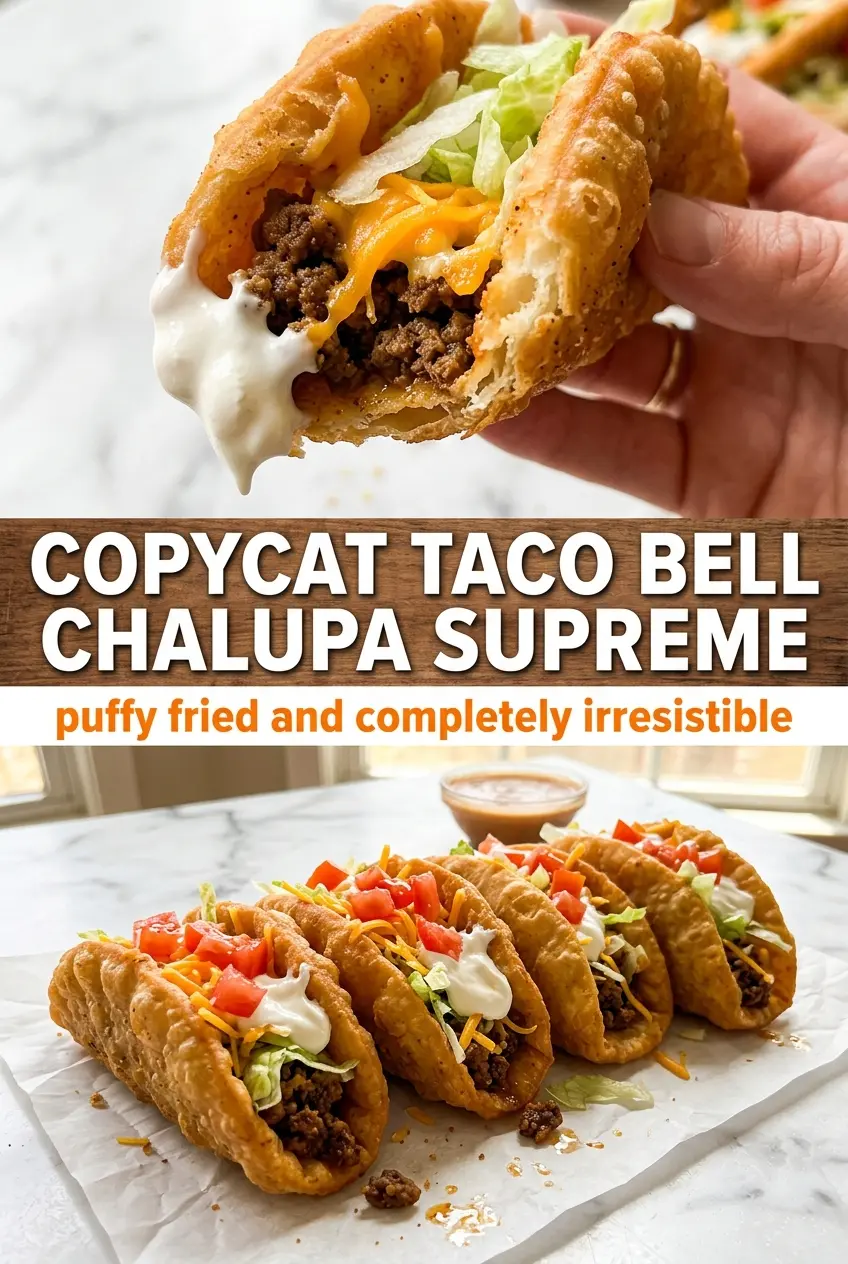
Puffy, golden chalupa shells change the whole experience before the first bite. The outside shatters lightly, the inside stays tender and a little chewy, and every pocket holds onto seasoned beef, cool sour cream, crunchy lettuce, and salsa without collapsing halfway through dinner. That contrast is what makes a homemade Chalupa Supreme worth frying at home instead of settling for a soft taco.
The trick is giving the tortilla enough heat to puff before you fold it, then frying just long enough to set that shape without drying it out. Ground beef works best here because it picks up taco seasoning fast and gives you those little craggy bits that sit inside the shell instead of sliding out. The toppings matter too: cold sour cream against hot beef keeps each bite balanced, and crisp lettuce keeps the shell from feeling heavy.
Below, you’ll find the small timing details that keep the shells crisp, the beef juicy, and the finished chalupas sturdy enough to eat by hand.
The shells puffed up exactly like the restaurant version, and the beef mixture stayed saucy without making everything soggy. My husband said the folded tortilla held together better than the ones we usually get out.
Love these crispy copycat chalupa shells? Save this Taco Bell Chalupa Supreme for the night you want that puffy fried pocket with all the classic toppings.
The Reason the Shell Puffs Instead of Staying Flat
The whole recipe rises or falls on the oil temperature. If the oil is too cool, the tortilla drinks it up and turns greasy before it ever puffs. At 375°F, the tortilla blisters fast, traps steam, and balloons just enough to create that light pocket inside.
Folding it after it starts to puff matters just as much. The tortilla needs a few seconds in the oil to become flexible, but if you wait too long, it gets stiff and cracks when you bend it. Frying one shell at a time keeps the temperature steady, which is the difference between a crisp chalupa and a heavy, oily tortilla.
What Each Ingredient Is Actually Doing in This Chalupa
- Ground beef — This gives you the savory, crumbled filling that feels closest to the restaurant version. An 80/20 blend is ideal because it stays juicy, but if you use leaner beef, keep a close eye on it so it doesn’t turn dry after the seasoning goes in.
- Taco seasoning and water — The seasoning brings the familiar chalupa flavor, and the water helps it coat every bit of beef instead of sitting in dusty clumps. If you use homemade seasoning, keep the liquid in the pan so the meat stays saucy.
- Small flour tortillas — These are the shell, so size matters. Corn tortillas won’t puff and fold the same way, and larger flour tortillas tend to get awkward to handle before the center firms up.
- Vegetable oil — You want a neutral oil with a high smoke point for clean frying. Peanut or canola oil also works if that’s what you keep on hand.
- Cheddar, sour cream, lettuce, tomatoes, jalapeños, salsa — The toppings are a texture game: cold, creamy, crisp, juicy, and a little sharp. Pre-chop everything before you fry so the shells go from oil to filling without waiting around and softening.
Frying the Shells Before Anything Else Cools Them Down
Season the Beef Until It Turns Saucy
Brown the beef in a skillet, breaking it up as it cooks so you get small crumbles instead of big clumps. Once the fat is drained, stir in the taco seasoning and water and let it simmer until the liquid reduces and clings to the meat. If the pan still looks watery at the end, keep it over the heat a minute or two longer; soggy beef is what makes the shells slide apart.
Puff and Fold the Tortillas Fast
Heat the oil to 375°F, then slip in one tortilla at a time with tongs. It should puff within seconds; as soon as that happens, gently fold it in half so it keeps that chalupa shape. Fry each side until deeply golden, not pale gold, because the extra color is what gives the shell structure.
Fill Them While They Still Have Crunch
Drain the shells on paper towels, then fill them right away while they’re still warm and crisp. Start with beef, then cheese, sour cream, lettuce, tomatoes, jalapeños, and salsa. If you wait too long, steam softens the shell from the inside, which is the fastest way to lose that signature crunch.
How to Adapt This for Different Eaters and Different Cravings
Make it lighter without losing the crunch
Use lean ground beef and drain it well, then go easy on the cheese and sour cream. The chalupa still eats like the original, but the filling feels a little less heavy. Don’t skip the frying step if you want the real texture.
Make it gluten-free with a different shell strategy
Flour tortillas are what create the classic puff, so a direct gluten-free swap won’t behave the same way. If you need to avoid gluten, use certified gluten-free flour-style tortillas made for frying and test one first, since some brands crack before they bend.
Swap the beef for a vegetarian filling
Seasoned black beans, refried beans, or a mix of both works well here. The filling won’t have the same crumbled texture, but it gives you the same salty, savory center and holds up cleanly inside the shell.
Turn up the heat without making it messy
Add extra jalapeños or a spoonful of hot salsa after filling the shells, not before frying. That keeps the heat where you want it and prevents the toppings from making the shell wet too early.
Storage and Reheating
- Refrigerator: Store the beef separately for up to 4 days. Fried shells lose their crackly edge fast once assembled, so keep the toppings separate too.
- Freezer: The beef freezes well for up to 2 months. The fried tortillas do not freeze well once cooked, since thawing makes them soft and leathery.
- Reheating: Reheat the beef in a skillet or microwave until hot, then fry fresh tortillas for the best texture. If you need to crisp an already fried shell, use a dry skillet or a few minutes in a hot oven; the microwave will flatten the shell and make it soggy.
Questions I Get Asked About This Recipe
Copycat Taco Bell Chalupa Supreme
Ingredients
Equipment
Method
- Brown ground beef in a skillet, breaking it apart as it cooks, for about 8 minutes until no longer pink. Visual cue: the beef turns crumbly and browned.
- Drain excess fat from the skillet, then stir in taco seasoning and water. Visual cue: seasoning looks evenly mixed into the beef.
- Simmer the mixture for 5 minutes, stirring occasionally, until thickened. Visual cue: small bubbles appear around the edges.
- Heat vegetable oil to 375°F in a Dutch oven. Visual cue: bubbles form immediately around a test tortilla edge.
- Carefully place one tortilla in the oil using tongs and fry until it puffs up within seconds. Visual cue: the tortilla balloons into a pocket almost immediately.
- Gently fold the tortilla in half and fry for about 1-2 minutes per side until golden. Visual cue: deep golden brown spots appear on both faces.
- Drain the fried chalupa shell on paper towels to remove excess oil. Visual cue: surface looks drier and less glossy.
- Repeat with the remaining tortillas, keeping the oil at 375°F between batches. Visual cue: each shell puffs quickly and turns uniformly golden.
- Fill each fried chalupa with seasoned beef, spreading it to the edges. Visual cue: beef layer is even across the pocket.
- Add shredded cheddar cheese and let it sit so it can melt slightly from the hot beef. Visual cue: cheese looks glossy as it softens.
- Top with sour cream, shredded lettuce, diced tomatoes, and diced jalapeños in that order. Visual cue: toppings form distinct layers with visible colors.
- Serve immediately with salsa for serving. Visual cue: a spoonable salsa pour sits on top without soaking through.