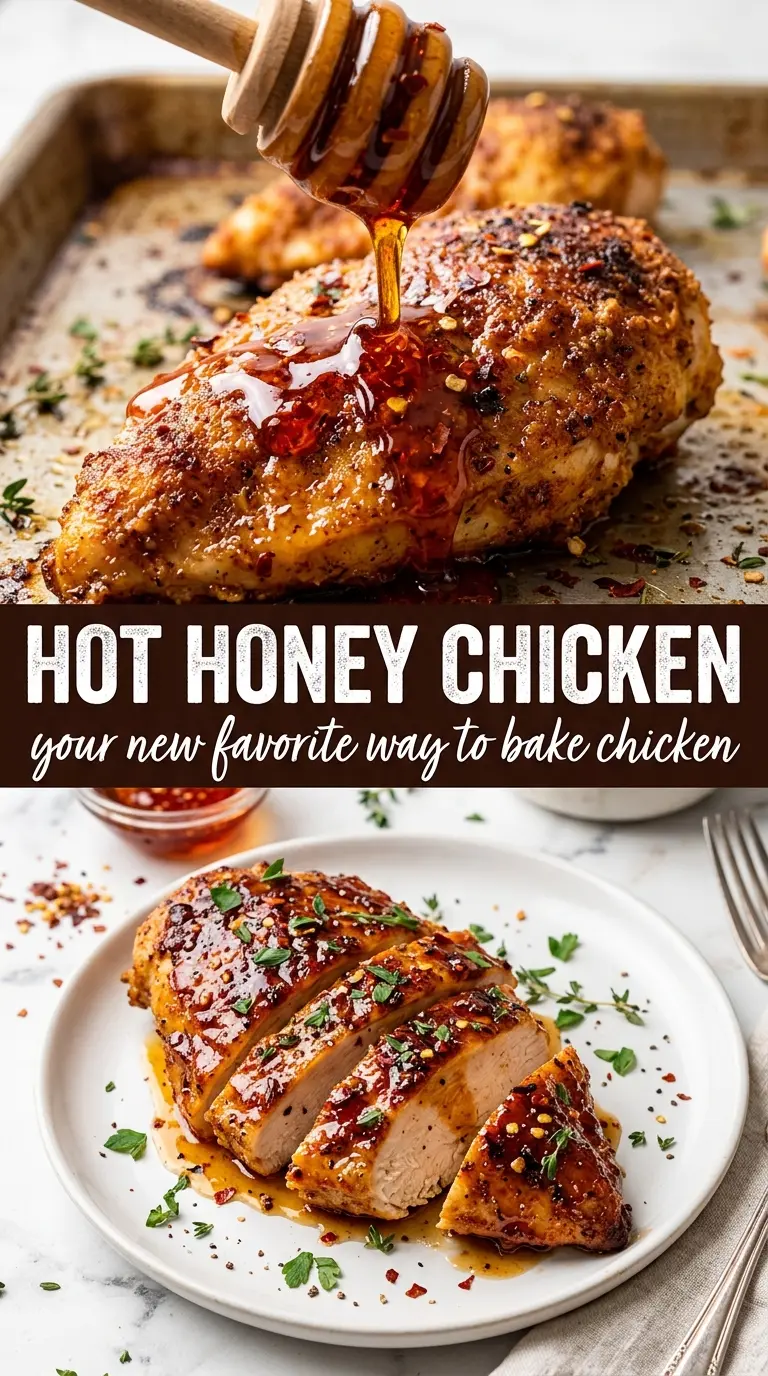
Hot honey baked chicken breasts come out with a sticky, burnished glaze and juicy meat that stays tender instead of drying out in the oven. The sweet heat catches on the edges, the honey turns dark amber in the heat, and the whole dish lands right in that spot between weeknight easy and worth repeating.
The trick is in the glaze and the oven temperature. Honey alone can go from glossy to scorched fast, so the hot sauce, butter, and vinegar loosen it enough to brush on in layers without turning the chicken into a burned sugar situation. A hot oven helps the glaze tighten and caramelize before the breasts lose their juiciness, and basting halfway through gives you that lacquered finish instead of a thin, one-note coating.
Below, I’ve included the small moves that matter most here: how to keep chicken breasts from drying out, how to tell when the glaze is done, and a few swaps if you need to work with what’s in the pantry.
The glaze turned sticky and caramelized instead of sliding off, and the chicken stayed juicy all the way through. I basted at the halfway point like you said, and the red pepper flakes gave it just enough heat without overpowering the honey.
Save these hot honey baked chicken breasts for a sticky-sweet dinner with caramelized edges and just enough heat.
The Glaze Needs Just Enough Acid to Stay Brushable
Honey is the star here, but honey on its own gets thick and clingy fast. The hot sauce and apple cider vinegar loosen it into something you can brush on in a clean, even layer, and the butter helps it melt into the chicken instead of sitting on top like syrup. If your glaze turns grainy or stubborn in the bowl, it usually means the butter was too cool or the honey was too thick; whisking it until fully smooth before it hits the chicken keeps the coating even.
The other thing people miss is how quickly honey darkens in a hot oven. That’s the point here, but it means your pan setup matters. A lightly oiled baking dish or cast iron skillet gives the glaze room to caramelize without welding itself to the pan.
- Honey — Use a honey you like eating straight from the spoon. Since it’s the base of the glaze, a bland one tastes flat.
- Hot sauce — Frank’s-style hot sauce adds vinegar, salt, and heat in one shot. A thicker, sweeter hot sauce won’t behave the same way and can make the glaze heavy.
- Apple cider vinegar — This sharpens the sweetness and keeps the glaze from tasting like candy. Lemon juice works in a pinch, but it reads brighter and less round.
- Butter — This gives the glaze a smoother, richer finish and helps it cling. If you skip it, the sauce can separate a little more on the chicken.
What Each Ingredient Is Actually Doing in This Chicken Dish
- Chicken (bone-in or boneless, skin-on or skinless) — Each cut has different cooking times and flavor profiles. Let thighs reach 165°F; breasts dry out if overcooked past that.
- Sauce or braising liquid (the moisture keeper) — This prevents the chicken from drying out and adds flavor. Don’t skip it even if the recipe seems moist.
- Aromatics (garlic, onion, herbs) — These add depth and complexity. Cook them with fat so they soften and sweeten instead of staying sharp.
- Cream or butter (optional richness) — These make the dish luxurious. Add to the sauce off the boil so it stays smooth instead of breaking.
- Cheese (if using) — This adds umami and richness. Mix into the sauce or sprinkle on top; either works depending on the dish.
- Acid (lemon, vinegar, wine, or tomato) — This prevents heavy sauces from tasting flat. Add at the end so the brightness doesn’t cook off.
- Proper temperature (165°F is perfect) — Use a thermometer to avoid guessing. Pull slightly early if the chicken will rest or finish in residual heat.
- Resting time (at least 5 minutes) — This lets juices redistribute so the meat stays moist when you cut into it instead of running dry.
Getting the Chicken Browned Without Drying It Out
Seasoning the Breasts Evenly
Pat the chicken dry first, then season both sides with salt, pepper, garlic powder, and smoked paprika. Dry chicken browns better, and the spices cling instead of dissolving into moisture on the surface. If the breasts are very thick on one end and thin on the other, press the thicker side gently so they cook more evenly and the thinner ends don’t go stringy before the center is done.
Brushing on the First Layer
Lay the chicken in the prepared dish and brush on a generous coat of glaze before it goes into the oven. This first layer starts the caramelization early, which gives you that dark, sticky surface by the end of the bake. Don’t pour all the glaze over at once; a brushed layer gives you better control and keeps the sauce from pooling and burning around the chicken.
Basting at the Halfway Point
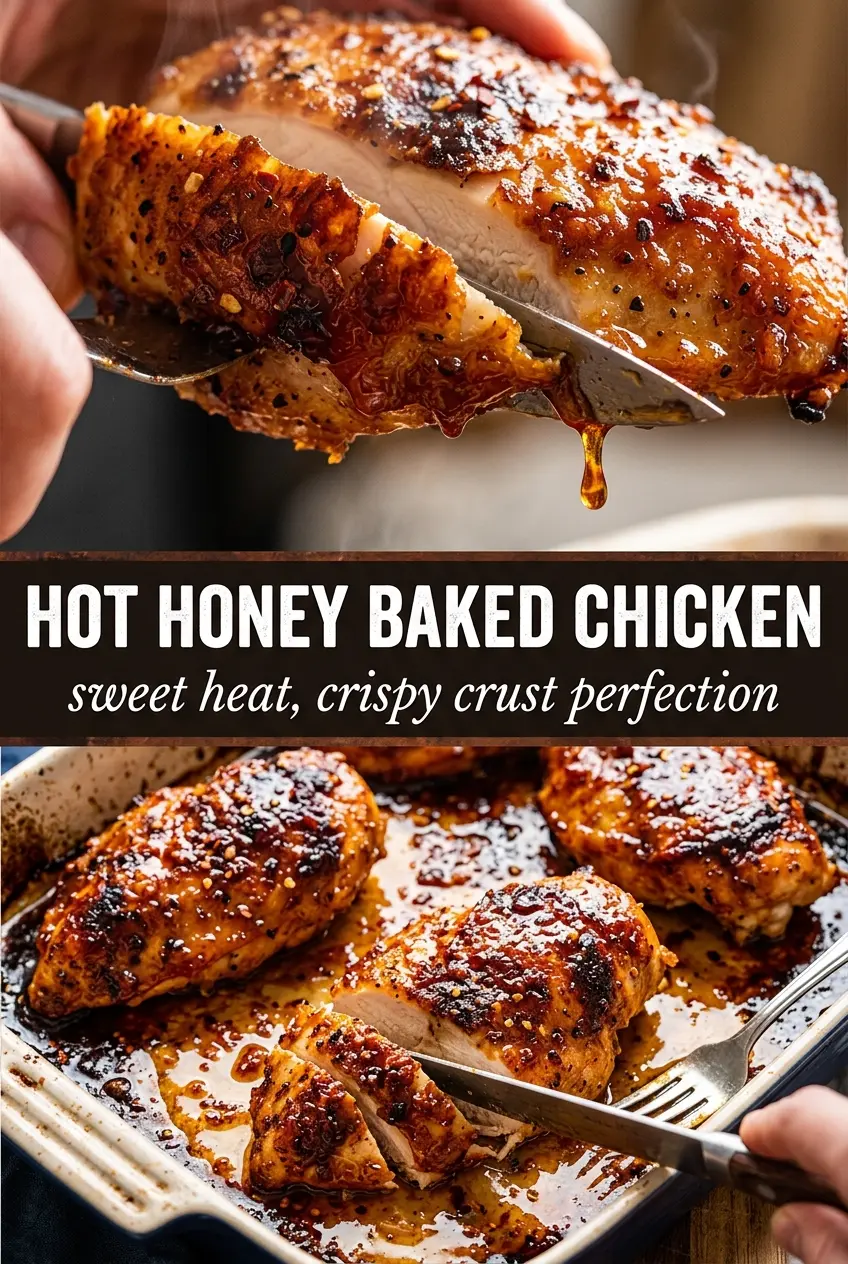
After about 10 to 12 minutes, baste with the reserved glaze. That second layer is what builds the lacquered finish, but it only works if the chicken already has a little structure from the first bake. If the glaze starts to look too dark too fast, tent the pan loosely with foil for the last few minutes so the sugar doesn’t go from amber to bitter.
Knowing When It’s Done
Pull the chicken when the center reaches 165°F and the juices run clear. The glaze should look glossy, dark amber, and a little sticky around the edges. Let it rest for 5 minutes before slicing; if you cut too soon, the juices run out and the glaze slides off the top instead of staying put.
Small Tweaks That Still Keep the Sweet Heat
Make it dairy-free
Swap the butter for olive oil or a dairy-free butter substitute. The glaze won’t taste quite as rounded, but it will still brush on cleanly and caramelize well. Olive oil gives a slightly sharper finish, while vegan butter keeps the richest texture.
Use chicken thighs instead
Boneless skinless thighs work if you want a juicier, slightly richer result. They usually need a few extra minutes in the oven, and the glaze can go even darker without drying out the meat, which makes them forgiving if your oven runs hot.
Dial the heat up or down
For a milder version, cut the red pepper flakes in half and use less hot sauce. For more fire, add another pinch of flakes after baking so the heat stays bright instead of getting muted in the oven. That post-bake finish gives a cleaner burn without risking a scorched glaze.
Make it gluten-free
This recipe is naturally gluten-free as written, as long as your hot sauce is certified gluten-free. That’s the only label worth checking here, since the rest of the ingredients don’t bring gluten into the dish.
Storage and Reheating
- Refrigerator: Store leftovers in an airtight container for up to 4 days. The glaze will thicken as it chills, which is normal.
- Freezer: It freezes well for up to 2 months, though the glaze loses a little shine after thawing. Wrap portions tightly and freeze with a little extra sauce if you want the coating to stay saucy.
- Reheating: Warm covered in a 325°F oven until heated through, or slice and reheat gently in a skillet over low heat with a spoonful of water. High heat dries out the chicken and can make the honey glaze go tacky and hard instead of glossy.
Answers to the Questions Worth Asking
Hot Honey Baked Chicken Breasts
Ingredients
Equipment
Method
- Preheat the oven to 425°F and lightly oil a baking dish or cast iron skillet.
- Season the chicken breasts on both sides with salt, pepper, garlic powder, and smoked paprika.
- Whisk together honey, hot sauce, melted butter, apple cider vinegar, red pepper flakes, and garlic powder until smooth.
- Place the chicken in the prepared dish and brush generously with the hot honey glaze, reserving some for basting.
- Bake for 20-22 minutes, basting with the remaining glaze once at the halfway point, until the internal temperature reaches 165°F and the glaze is caramelized.
- Rest the chicken for 5 minutes.
- Finish with flaky sea salt, fresh thyme, and an extra drizzle of hot honey.