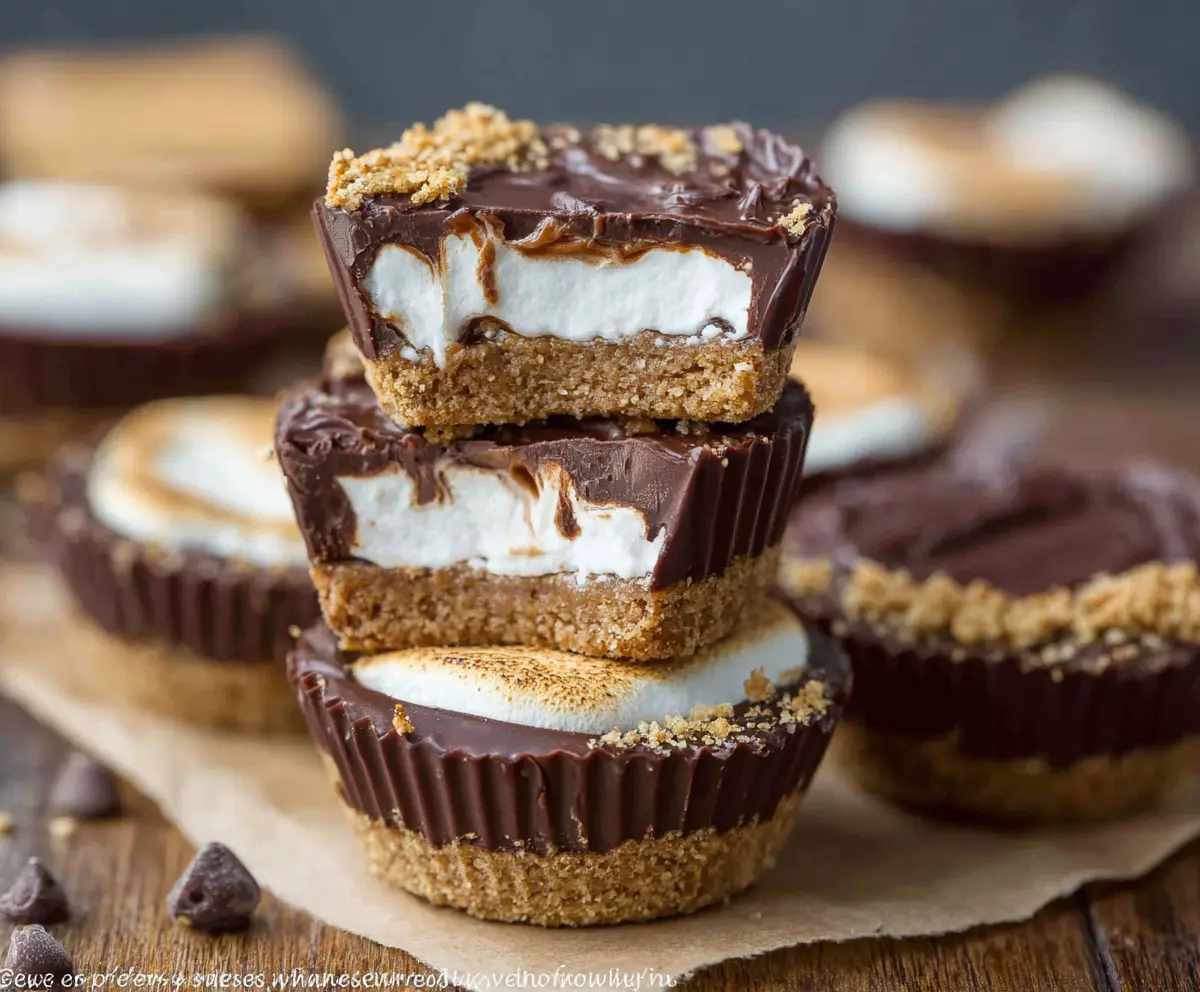
These S’mores Peanut Butter Cups are a fun twist on the classic treat! With creamy peanut butter, crunchy graham crackers, and fluffy marshmallow all wrapped in smooth chocolate, they’re irresistible.
Whenever I make these, I can’t help but sneak a few bites before they’re even set. They’re like a campfire favorite you can enjoy any time—who doesn’t love that? 😄
Key Ingredients & Substitutions
Graham Cracker Crumbs: These are key for that classic S’mores flavor. If you don’t have them, you can use digestive biscuits or even vanilla wafer cookies. For a gluten-free option, try gluten-free graham crackers.
Unsalted Butter: Unsalted butter is preferred for controlling the salt content. You can substitute coconut oil for a dairy-free option or vegan butter if needed.
Creamy Peanut Butter: You can use natural peanut butter for a healthier choice, but any creamy variety will do. Almond butter or sunflower seed butter work well if you’re looking for nut-free alternatives.
Semisweet Chocolate Chips: These are perfect for the sweetness and texture. Dark chocolate chips are a great substitute if you prefer a richer taste. For a sweeter bite, you could also use milk chocolate chips.
Mini Marshmallows: If you can’t find mini marshmallows, large marshmallows can be chopped up. Marshmallow fluff is a great alternative if you like a gooey texture.
How Do I Get the Perfect Chocolate-Peanut Butter Blend?
Melted chocolate and peanut butter create a delicious layer, but it’s important to get the technique right. Here’s how to do it:
- Use a microwave-safe bowl and heat in 30-second bursts. Stir between each interval to avoid burning.
- Once melted, the mixture should be smooth and creamy; if it’s too thick, you can add a splash of oil to loosen it up a bit.
- Pour it gently over your crust, as this helps maintain the layers without disturbing them.
Trust me, getting this part right is key to tasty S’mores Peanut Butter Cups!
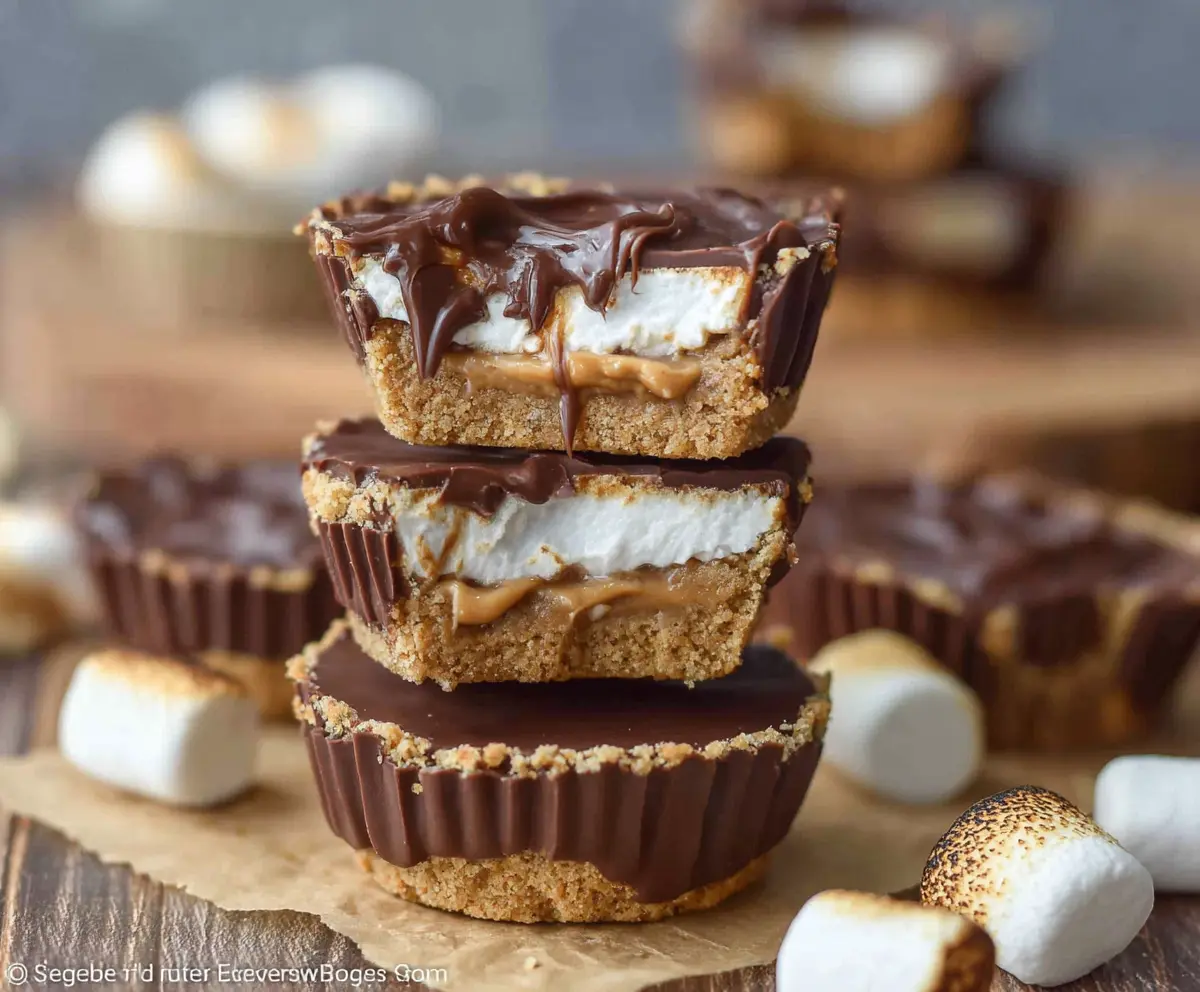
Delicious S’mores Peanut Butter Cups Recipe
Ingredients You’ll Need:
For the Crust:
- 1 1/2 cups graham cracker crumbs (about 10 full sheets)
- 6 tablespoons unsalted butter, melted
For the Filling:
- 1/4 cup creamy peanut butter (plus extra for spreading)
- 3/4 cup semisweet chocolate chips
- 1 cup mini marshmallows or large marshmallow fluff
Optional Toppings:
- Extra graham cracker crumbs for garnish
How Much Time Will You Need?
This recipe takes about 15 minutes of active prep time, plus at least 1 hour for chilling in the refrigerator. It’s a quick and easy way to make a delightful treat that will impress your friends and family!
Step-by-Step Instructions:
1. Prepare the Muffin Tin:
Start by lining a standard muffin tin with paper liners. This will help you easily remove the cups once they’re set. It’s a little step, but it makes things a whole lot cleaner and easier!
2. Make the Graham Cracker Crust:
In a medium bowl, combine the graham cracker crumbs and melted butter. Stir everything together until it looks like wet sand. This mixture should hold together when you squeeze it.
3. Form the Crust:
Press about 2 tablespoons of the graham cracker mixture firmly into the bottom of each paper liner. Make sure it’s packed well; this will be the sturdy base for your delicious peanut butter cups!
4. Melt the Chocolate and Peanut Butter:
In a microwave-safe bowl, add the creamy peanut butter and chocolate chips. Microwave in 30-second intervals, stirring between each, until the mixture is smooth and well combined. Be careful not to overheat it!
5. Add the Chocolate-Peanut Butter Layer:
Spoon a layer of this chocolate-peanut butter mixture over the graham cracker crust in each cup. Spread it evenly so every bite is full of flavor.
6. Add the Marshmallow Layer:
Now, add either a layer of mini marshmallows or a spoonful of marshmallow fluff on top of the chocolate layer. This is where the fun S’mores flavor really comes in!
7. Spread More Peanut Butter:
Next, add a thin layer of your extra peanut butter on top of the marshmallow. This adds a nice creamy texture that complements the other layers perfectly!
8. Cover with More Chocolate-Peanut Butter Mixture:
Finally, cover the marshmallow layer completely with any remaining chocolate-peanut butter mixture. Make sure it’s fully sealed to keep the marshmallow nice and soft.
9. Garnish:
If you want to make your treats look extra special, sprinkle a few extra graham cracker crumbs on top for a fun garnish.
10. Chill:
Refrigerate the cups for at least 1 hour, or until they are firm. This step is key—it helps all the layers set up nicely!
11. Optional: Toast the Marshmallow:
If you’d like a toasted marshmallow effect, use a kitchen torch to lightly brown the marshmallow; or you can briefly broil them in the oven, just watch them closely so they don’t burn!
12. Serve and Enjoy!
When you’re ready to enjoy, carefully remove the S’mores Peanut Butter Cups from their liners and serve them chilled. They make for a perfect treat at any time of the year. Enjoy your delightful creation!
Can I Use Different Types of Nut Butters?
Absolutely! You can substitute almond butter or sunflower seed butter if you want a different flavor or need a nut-free option. Just keep in mind that the flavor will change slightly.
Can I Store These Peanut Butter Cups?
Yes! Store them in an airtight container in the fridge for up to a week. They also freeze well; just make sure to separate them with parchment paper if stacking.
What Can I Use Instead of Graham Crackers?
If you can’t find graham crackers, digestive biscuits or vanilla wafers work just as well. For a gluten-free version, look for gluten-free graham crackers at the store!
How Do I Ensure the Marshmallows Stay Soft?
To keep the marshmallows soft and fluffy, make sure to layer them directly on top of the warm chocolate-peanut butter mixture before it sets. This helps them adhere well without becoming hard.