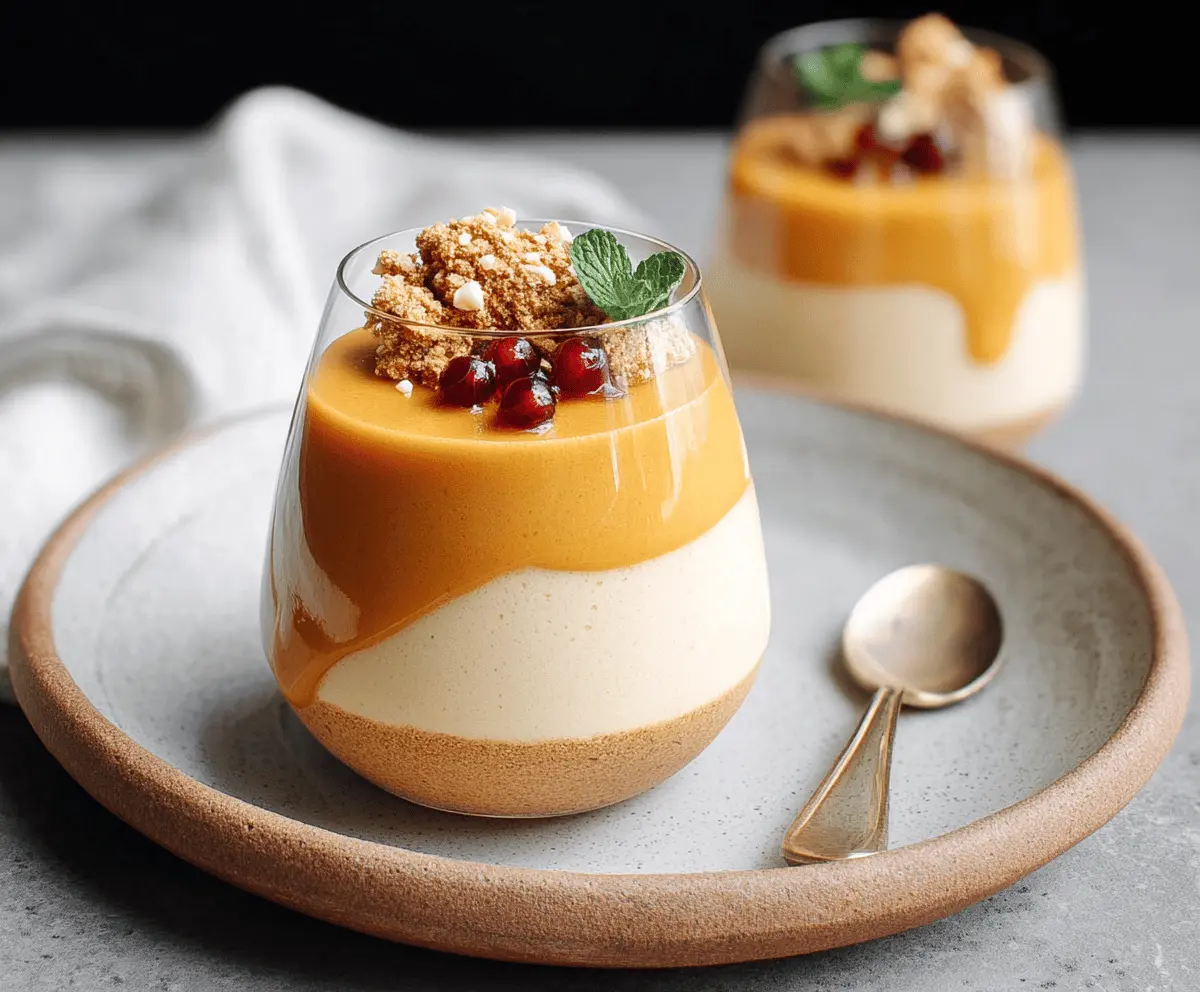
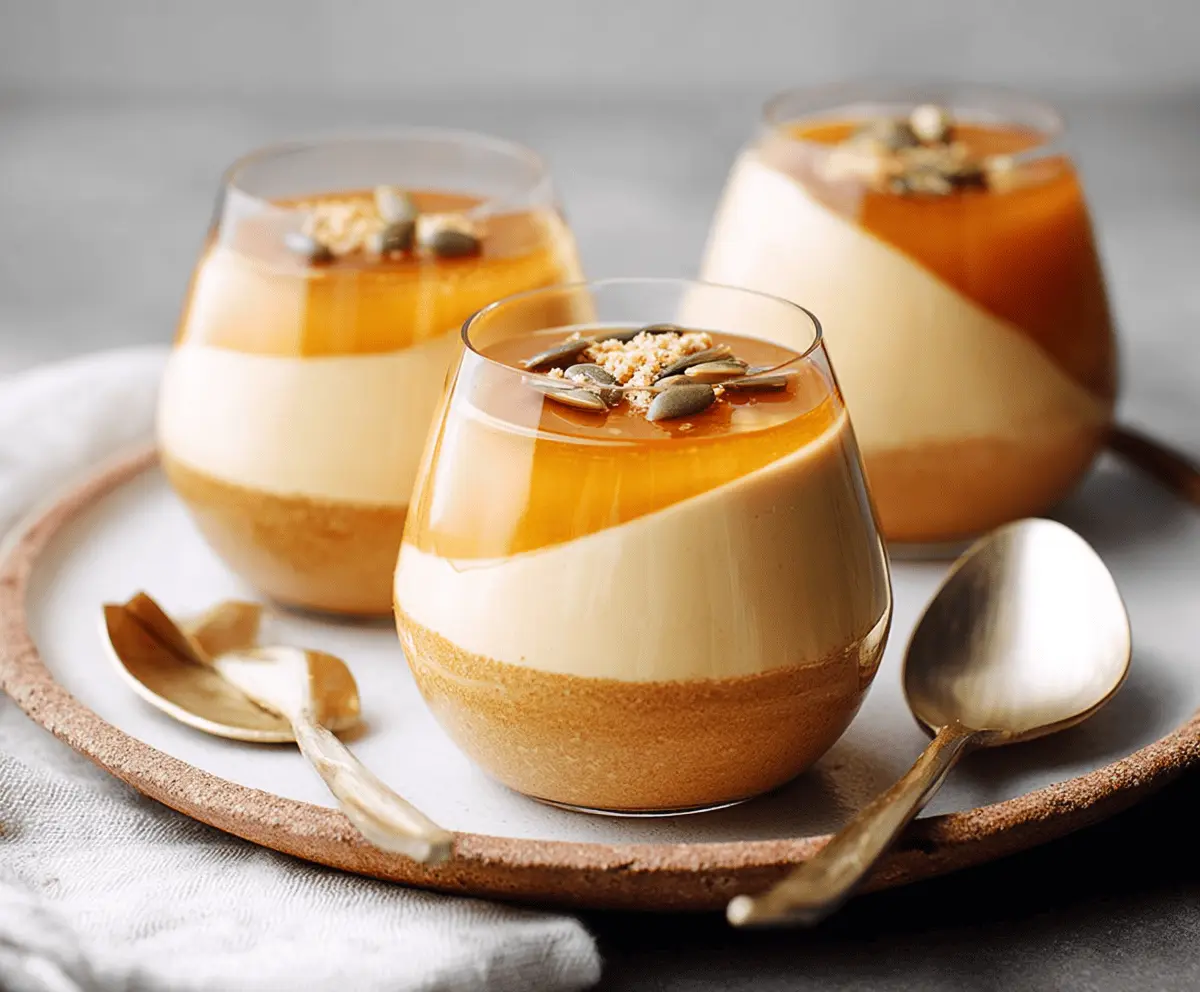
This Pumpkin Panna Cotta is a creamy dessert that perfectly blends pumpkin and spices into a smooth treat. It’s like fall in a cup! 🍂
Making it is a breeze—just mix, pour, and let it chill. I love serving it with a sprinkle of cinnamon on top. Trust me, it’s a great way to impress anyone at the table!
Key Ingredients & Substitutions
Pumpkin Purée: Use canned pumpkin for convenience, but fresh roasted pumpkin adds a nice homemade touch. If you’re in a pinch, butternut squash purée works great too!
Gelatin: I prefer using powdered gelatin for stability, but agar-agar is a fantastic vegan alternative. You’ll need about the same amount; just follow the package instructions for blooming.
Heavy Cream: While heavy cream adds richness, you can substitute half-and-half or coconut cream for a lighter or dairy-free option, respectively.
Spices: I love the flavor combo of cinnamon, ginger, and nutmeg, but feel free to adjust based on your taste. You can also add a pinch of allspice for more warmth.
Graham Cracker Crumbs: If you don’t have graham crackers, crushed oatmeal cookies or digestive biscuits make an excellent crust. For a gluten-free option, look for gluten-free cookies.
How Do You Get That Perfect Layered Look?
Creating those lovely layers in your Panna Cotta can be a fun part of the process! Here’s how to achieve it:
- After preparing your graham cracker crust and panna cotta mixture, tilt the glasses gently. This helps form an angled layer that looks impressive.
- Pour the panna cotta slowly and steadily into the tilted glasses. It’s okay if it doesn’t fill perfectly; the gentle pour minimizes splashing.
- Let the first layer set completely in the fridge before adding any additional layers. Cooling first ensures that your layers won’t mix.
Just be patient and gentle, and you’ll have beautifully layered dessert cups that taste as good as they look!
How to Make Pumpkin Panna Cotta
Ingredients You’ll Need:
For the Panna Cotta:
- 1 cup pumpkin puree (canned or fresh)
- 2 ½ teaspoons powdered gelatin (about 1 packet)
- 3 tablespoons cold water (for blooming gelatin)
- 2 cups heavy cream
- ½ cup whole milk
- ½ cup granulated sugar
- 1 teaspoon vanilla extract
- 1 teaspoon ground cinnamon
- ½ teaspoon ground ginger
- ¼ teaspoon ground nutmeg
- Pinch of salt
For the Crust Layer:
- ¼ cup graham cracker crumbs
- 2 tablespoons melted butter
For the Garnish:
- Pumpkin seeds
- Extra graham cracker crumbs
- Optional: caramel sauce or maple syrup for drizzling on top
How Much Time Will You Need?
This delightful dessert takes about 20 minutes to prepare and requires at least 4 hours to chill in the fridge. If you decide to make the optional layer, plan for an extra 1-2 hours of chilling time. So, set aside some time to enjoy this delicious treat!
Step-by-Step Instructions:
1. Prepare the Gelatin:
In a small bowl, sprinkle the powdered gelatin over 3 tablespoons of cold water and allow it to bloom for about 5 minutes. This step is crucial as it helps the gelatin dissolve properly later.
2. Make the Graham Cracker Crust:
In a small bowl, mix together the graham cracker crumbs and melted butter until the crumbs are evenly moistened. Divide this mixture among 4 serving glasses and gently press it into the bottom to form a crust. Pop these glasses in the fridge to chill while you’re preparing the panna cotta.
3. Heat the Cream Mixture:
In a medium saucepan, combine the heavy cream, whole milk, granulated sugar, vanilla extract, ground cinnamon, ginger, nutmeg, and a pinch of salt. Heat the mixture over medium heat, stirring occasionally, until it’s just simmering and the sugar has completely dissolved, which will take about 5 minutes.
4. Add Pumpkin and Gelatin:
Once hot, remove the saucepan from the heat. Stir in the pumpkin puree until the mixture is smooth. Then, add the bloomed gelatin and whisk until it is fully dissolved. This fluffy blend of flavors is what makes the panna cotta so creamy and delicious!
5. Assemble the Panna Cotta Layer:
Retrieve the glasses from the fridge. To create an elegant angled look, tilt each glass in a muffin tin or a bowl. Then, carefully pour the pumpkin panna cotta mixture into each glass, filling them about ⅔ full. Afterward, straighten them up and return the glasses to the fridge to chill for at least 4 hours or overnight until set.
6. Make the Clear Layer (Optional):
If you’d like to add a lovely clear layer, follow these steps:
- In a small bowl, sprinkle 1 teaspoon of gelatin over 2 tablespoons of cold water and let it bloom for 5 minutes.
- In a small saucepan, heat ⅓ cup of apple cider with a tablespoon of maple syrup or honey and a pinch of cinnamon. Stir in the bloomed gelatin until fully dissolved, then let it cool slightly.
- Carefully pour this cooled gelatin on top of the set panna cotta layer. Place the glasses back in the fridge for another 1-2 hours until this layer is set.
7. Garnish and Serve:
When you’re ready to serve, lightly sprinkle pumpkin seeds and extra graham cracker crumbs on top for some extra crunch. If you wish, add a delicious drizzle of caramel sauce or maple syrup to finish off this delightful dessert!
Enjoy your elegant, creamy, and beautifully layered Pumpkin Panna Cotta! Perfect for any fall gathering or special occasion.
Can I Use Different Types of Milk in This Recipe?
Absolutely! While heavy cream and whole milk create a rich texture, you can substitute with almond milk, coconut milk, or oat milk for a lighter, dairy-free option. Just keep in mind that the texture may vary slightly!
Can I Make This Panna Cotta Vegan?
Yes! To make a vegan version, use plant-based milk (like coconut or almond) and replace gelatin with agar-agar. Follow the package instructions for substitution to ensure it sets properly.
How Do I Store Leftovers?
Store any leftovers in an airtight container in the fridge for up to 3 days. Before serving, gently rewarm in the microwave or enjoy it cold straight from the fridge!
Can I Prepare This Dessert in Advance?
Definitely! Pumpkin Panna Cotta can be made up to two days ahead of time. Just make sure to keep it covered in the fridge until you’re ready to serve. It tastes even better after the flavors have time to meld!