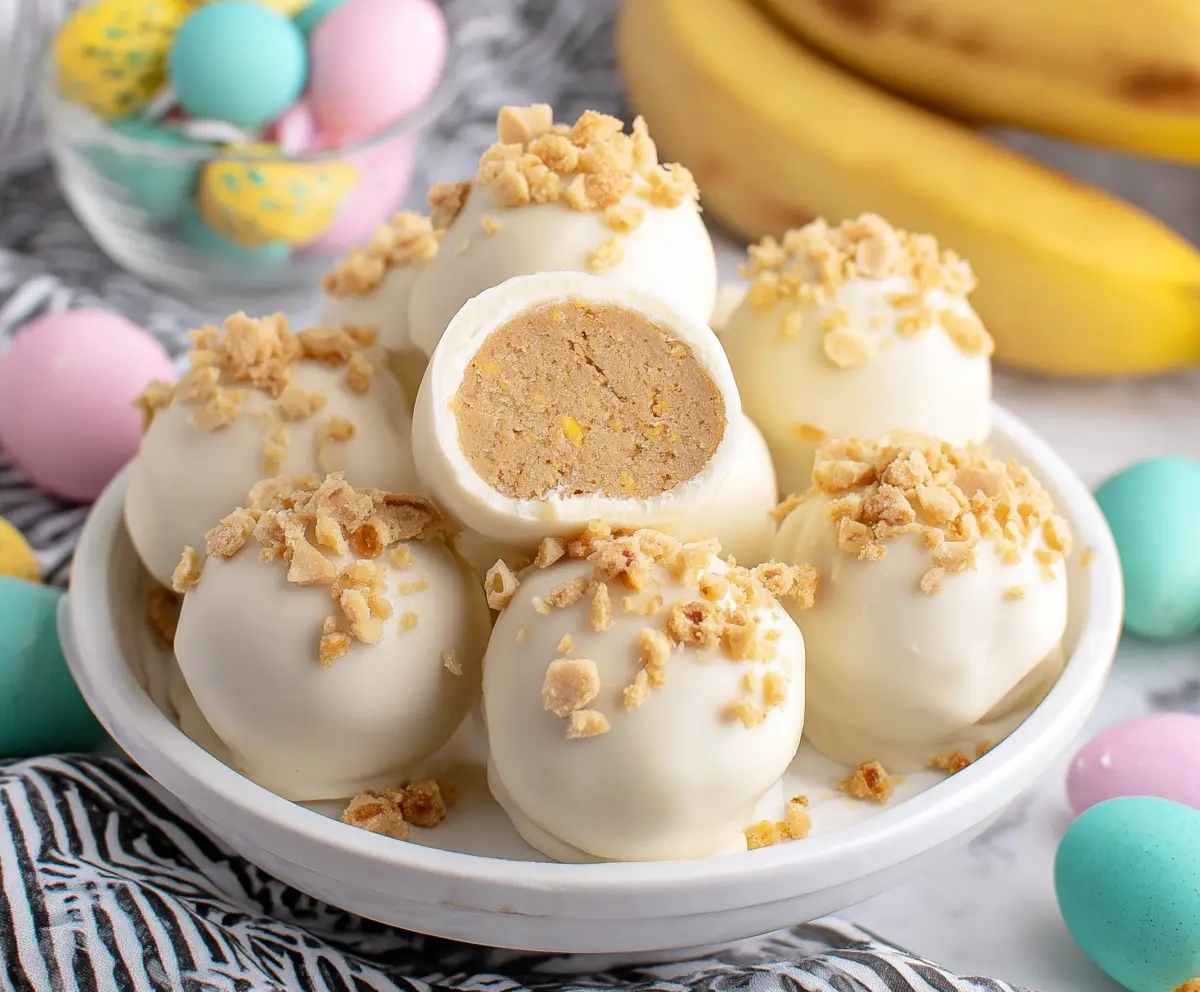
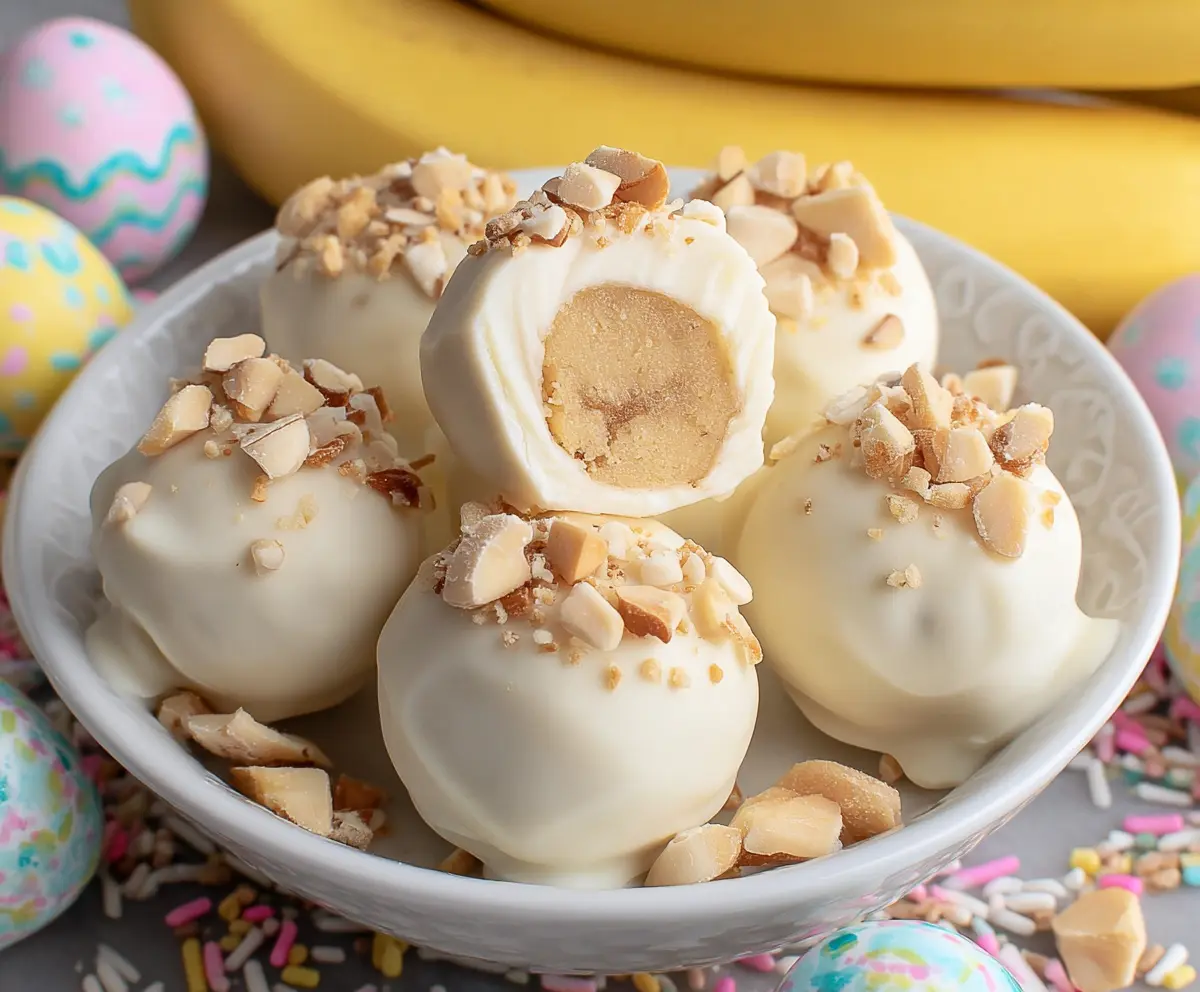
These Banana Pudding Easter Truffles are a fun twist on a classic treat! Made with creamy banana flavors, vanilla wafers, and a smooth coating, they’re perfect for any spring celebration.
They’re like little bites of joy! I love packing them up for picnics or sharing them with friends. Try not to eat them all in one sitting—I dare you! 😄
Key Ingredients & Substitutions
Vanilla wafer cookies: These give a crunch and flavor to the truffles. If you can’t find them, you can use graham crackers or even almond cookies for a slightly different taste.
Ripe mashed banana: The banana adds moisture and sweetness. If you’re out of bananas, you can substitute with mashed avocado for creaminess, but it won’t have the same banana flavor.
Cream cheese: Softened cream cheese creates a creamy texture. You can swap it with mascarpone or use Greek yogurt for a lighter version, but remember it may change the flavor a bit.
Instant vanilla pudding mix: This thickens the mixture and adds vanilla flavor. If you don’t have it, you can skip it, but your truffles may be softer. Consider using cornstarch as a thickener instead.
White chocolate or candy melts: These create the sweet coating. If you want to go darker, you can use milk chocolate or even a dairy-free option if needed!
How Can I Make Sure My Truffles Stay Firm?
Ensuring your truffles are firm starts with proper chilling. After mixing your ingredients, rolling them into balls, and placing them in the fridge is essential. Cooling for at least 30 minutes lets them set properly, making it easier to coat in chocolate.
- When melting the chocolate, do it slowly in 20-second intervals. This helps prevent burning.
- Make sure each ball is well-coated and let excess chocolate drip off before returning them to the parchment. This keeps the coating clean and neat.
- Once you garnish them, return the truffles to the fridge quickly to help the coating set. You can leave them until they’re hard, about 15-20 minutes.
How to Make Banana Pudding Easter Truffles
Ingredients You’ll Need:
For the Truffle Mixture:
- 1 cup vanilla wafer cookies (crushed into fine crumbs)
- 1/2 cup ripe mashed banana (about 1 medium banana)
- 8 oz cream cheese, softened
- 1 cup powdered sugar
- 1/4 cup instant vanilla pudding mix
- 1 tsp vanilla extract
For the Coating:
- 12 oz white chocolate or white candy melts
- 1/4 cup crushed vanilla wafer cookies or toffee bits (for garnish)
How Much Time Will You Need?
This delightful recipe will take about 15 minutes to prepare, plus an additional 45-50 minutes to chill and set the truffles. So, in less than an hour, you’ll have tasty treats ready to impress your friends and family!
Step-by-Step Instructions:
1. Make the Truffle Mixture:
Start by taking a large bowl and combining the crushed vanilla wafer cookies, ripe mashed banana, softened cream cheese, powdered sugar, instant vanilla pudding mix, and vanilla extract. Mix everything together until it forms a smooth, dough-like consistency. It’s okay to use your hands to knead it a bit, just ensure everything is well incorporated!
2. Shape the Truffles:
Once your mixture is ready, roll it into 1-inch balls. Place each ball onto a parchment-lined baking sheet. This is a great time to get the kids involved—they’ll love rolling the little treats! After you’ve shaped all your truffles, pop the baking sheet into the fridge for about 30 minutes. This will help them firm up nicely.
3. Melt the Coating:
While the truffles are firming up, melt your white chocolate or candy melts. Use a microwave-safe bowl and heat the chocolate in 20-second intervals, stirring between each interval until it’s completely smooth. Be careful not to overheat; you want a nice glossy finish!
4. Coat the Truffles:
Take your chilled truffle balls out of the fridge. Using a fork or a dipping tool, carefully dip each ball into the melted white chocolate, making sure to coat it completely. Once coated, let any excess chocolate drip off before placing it back onto the parchment paper. This will help keep your truffles neat and tidy!
5. Add the Toppings:
Before the chocolate coating sets, sprinkle the tops of your truffles with crushed vanilla wafer cookies or toffee bits for that extra crunch and flavor. This step is super fun, and you can be creative with how much you want to add!
6. Chill and Set:
Return the truffles to the fridge and let them chill for about 15-20 minutes. This allows the chocolate coating to harden completely. Trust us; the wait will be worth it!
7. Serve and Enjoy:
Once the chocolate is set, your Banana Pudding Easter Truffles are ready to serve! Enjoy them chilled, and watch as everyone enjoys these tasty, creamy treats that are perfect for your Easter celebrations!
Can I Use a Different Type of Chocolate for Coating?
Absolutely! While white chocolate gives a nice contrast, you can substitute with milk chocolate or dark chocolate if you prefer. Just be aware that it will change the flavor profile of the truffles slightly.
How Long Can I Store the Truffles?
Your Banana Pudding Easter Truffles can be stored in an airtight container in the refrigerator for up to one week. They’re perfect for making ahead of time!
What Should I Do If My Mixture Is Too Wet?
If your truffle mixture feels too wet to form into balls, you can add a bit more crushed vanilla wafer cookies or a tablespoon of powdered sugar to help bind it. Just be cautious not to add too much, as it may change the flavor!
Can I Freeze These Truffles?
Yes, you can freeze the truffles! Once they’re fully set, store them in an airtight container layered between parchment paper. They can be frozen for up to 3 months. Just allow them to thaw in the fridge before serving.