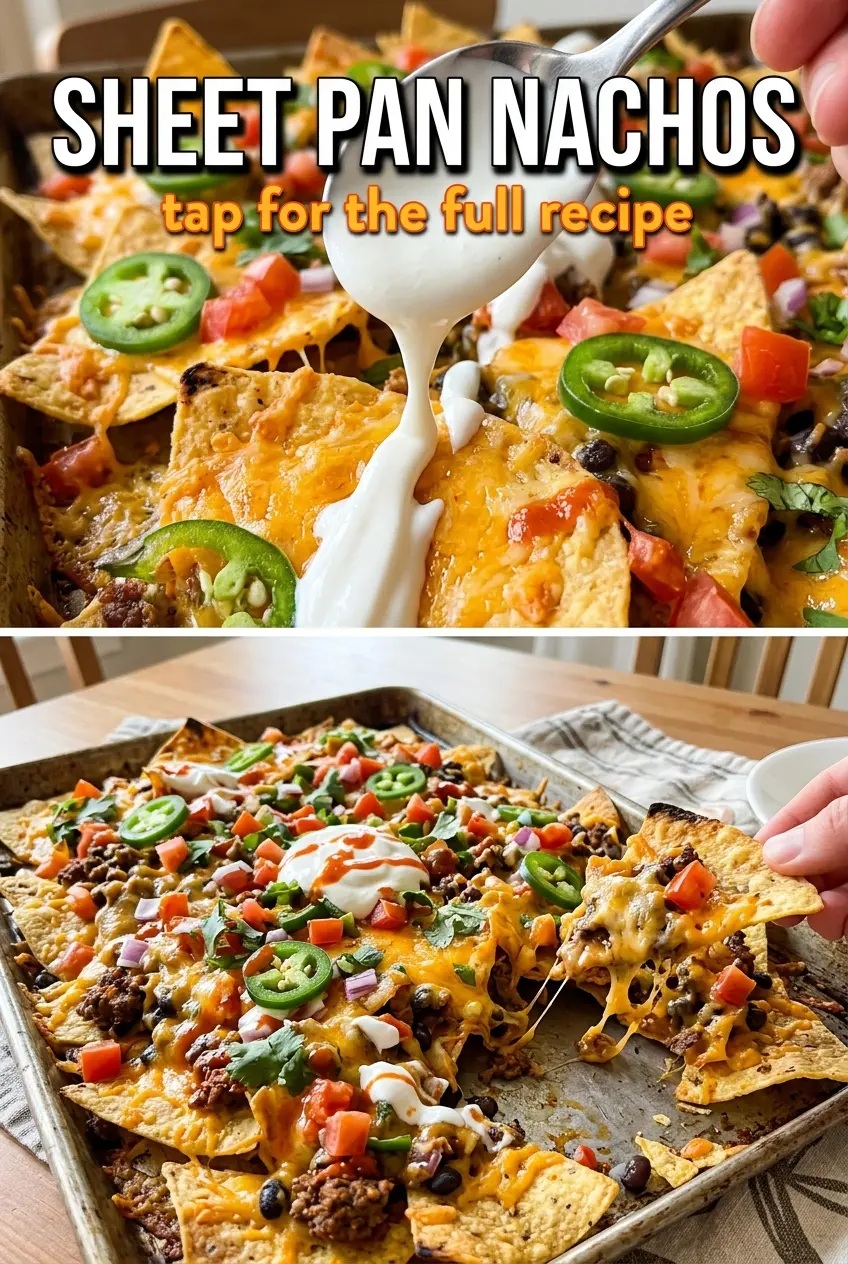
Sheet pan nachos are at their best when every chip gets at least a little cheese and a few of the good toppings, not when the whole pan turns into a pile of naked chips under a heavy center. The right setup gives you that ideal mix: crisp edges, molten cheese, seasoned beef or chorizo, and bright, cool toppings added after baking so nothing goes soggy before the tray hits the table.
What makes this version work is the layering. Some cheese goes under the toppings to help anchor everything to the chips, and the rest goes on top so it melts into a blanket instead of disappearing into the pan. The chips stay in a single layer, which sounds fussy until you’ve had nachos where the bottom half turns to crumbs. This is the kind of snack that disappears fast because it eats like real food, not just a pile of toppings.
Below, I’ve included the trick that keeps the chips from softening too soon, plus a few ways to swap the toppings without losing that loaded, party-ready feel.
The cheese melted into every corner and the chips stayed crisp on the edges. I loved that the beans and beef were spread out instead of dumped in the middle, so every scoop had a little of everything.
Save these sheet pan nachos for game day, movie night, or any time you want a pan of melted cheese and crisp chips with almost no cleanup.
The Trick That Keeps Nachos Crisp Instead of Soggy
The biggest mistake with sheet pan nachos is treating them like a casserole. If the chips are piled thick, the steam from the hot toppings softens everything underneath before the cheese even finishes melting. A single layer on a lined pan gives the heat somewhere to move, and it lets the cheese melt over the chips instead of steaming them into submission.
Another detail that matters is when the cold toppings go on. Sour cream, salsa, cilantro, avocado, and lime all belong after baking, not before. If they go in the oven, the salsa gets watery, the avocado dulls out, and the whole pan loses that sharp, fresh finish that makes nachos worth making in the first place.
- Spread the chips out with some overlap, but don’t build a mound.
- Use half the cheese under the toppings and half over them so the fillings stay put.
- Drain the beans well so extra liquid doesn’t collect on the pan.
- Add the cool toppings the second the pan comes out of the oven so the heat softens them just enough without making them runny.
What Each Topping Is Actually Doing Here
- Tortilla chips — Sturdy restaurant-style chips hold up best because they can take the weight of the meat, beans, and cheese without snapping immediately. Thin chips taste good, but they soften faster and break faster.
- Cheddar cheese — Cheddar gives you that classic nacho pull and a sharp enough flavor to stand up to beef or chorizo. If you want smoother melting, mix in a little Monterey Jack, but keep cheddar in the blend for flavor.
- Ground beef or chorizo — Beef gives you a classic, savory base. Chorizo brings more spice and fat, which means deeper flavor but also a little more grease; drain it well so the pan doesn’t turn oily.
- Black beans — They add bulk and make the nachos feel more substantial. Rinse and drain them well, then pat them dry if they seem wet so they heat through without making the chips soggy.
- Jalapeños and red onion — These go on before baking so they mellow slightly in the oven while still keeping some bite. Dice the onion finely so you get flavor without big raw chunks dominating each scoop.
- Sour cream, salsa, cilantro, avocado, and lime — These are the finish, not the filling. They bring coolness, acid, and freshness that keep the whole pan from tasting heavy.
Building the Pan So Every Chip Gets Covered
Start With the Chips, Not the Toppings
Line a large sheet pan with foil, then spread the chips in a single layer. You want surface area, not depth. If the chips are stacked too high, the bottom ones never get properly melted cheese and the top ones cool off before the pan reaches the table.
Anchor the Fillings With the First Layer of Cheese
Scatter the cooked beef, black beans, and half of the cheddar over the chips first. That first layer of cheese helps glue the toppings to the chips so everything doesn’t slide off when you lift a handful. If your meat is still steaming hot, let it cool for a minute before adding it so you don’t create extra moisture on the tray.
Finish With the Rest of the Cheese and Bake Until Bubbling
Top with the remaining cheese, jalapeños, and red onion, then bake at 400°F for 10 to 12 minutes. Pull the pan when the cheese is fully melted and bubbling at the edges. If you leave it in too long, the chips around the perimeter start to taste dry and overbrowned before the center is even set.
Add the Fresh Toppings Right Away
The moment the pan comes out, hit it with sour cream, salsa, cilantro, and avocado. The heat from the nachos softens the avocado just a little and loosens the aroma of the cilantro without cooking them down. Finish with lime wedges so people can brighten each bite at the table.
How to Adapt These Nachos Without Losing the Point
Make Them Vegetarian With More Texture
Skip the meat and double the black beans, or swap in seasoned crumbled tofu or a plant-based crumble. The key is to season the replacement well and cook off any excess moisture first, because bland or wet fillings are what flatten vegetarian nachos fast.
Use Chorizo for a Spicier, Richer Pan
Chorizo gives these nachos a deeper red color and a smoky, fatty flavor that melts into the cheese. Because it can release more grease than ground beef, drain it before it goes on the chips so the bottom layer stays crisp instead of slick.
Make It Gluten-Free Without Changing a Thing
Most tortilla chips are naturally gluten-free, but check the bag if you’re cooking for someone sensitive. Everything else here is already built for a gluten-free pan, as long as your salsa and any seasoned meat are made with gluten-free ingredients.
Turn It Into a Smaller Dinner for Two
Use half the chips and a quarter-sheet pan if you want a dinner-sized version instead of a party tray. The bake time may drop by a minute or two, so watch for melted cheese and hot edges rather than relying on the clock alone.
Storage and Reheating
- Refrigerator: Leftover nachos keep for 2 days, but the chips will soften as they sit. Store them in a container only if you need to; the texture is always best fresh.
- Freezer: These don’t freeze well once assembled. The chips and fresh toppings lose their texture, and the sour cream and salsa will separate.
- Reheating: Remove the cold toppings if possible, then warm the cheesy chips on a sheet pan in a 375°F oven for 5 to 8 minutes. The oven brings back some crispness; the microwave turns everything limp.
Questions I Get Asked About This Recipe
Sheet Pan Nachos
Ingredients
Equipment
Method
- Preheat the oven to 400°F and line a large sheet pan with foil for easy cleanup.
- Arrange the tortilla chips on the prepared sheet pan in a single layer so they bake evenly without steaming.
- Scatter the cooked ground beef or chorizo, black beans, and half of the shredded cheddar cheese over the chips to distribute topping coverage.
- Top with the remaining shredded cheddar cheese, then scatter the diced jalapeños and finely diced red onion on top for a colorful layer.
- Bake for 10-12 minutes at 400°F until the cheese is melted and bubbly, with melted edges coating the chips.
- Remove from the oven and immediately dollop with sour cream and spoon on salsa so the chips stay crisp beneath creamy toppings.
- Garnish with chopped fresh cilantro and sliced avocado for fresh, green contrast over the hot cheese.
- Serve with lime wedges, plus additional salsa and sour cream on the side for guests to customize heat and tang.